Oracle Real Application Clusters (Oracle RAC) is a clustered database infrastructure of Oracle Database based on a comprehensive high-availability stack that can be used as the foundation of a database cloud system as well as a shared infrastructure, ensuring high availability, scalability, and agility for any application. Oracle Real Application Cluster has been using with Oracle 9i version since in 2001. This feature provides software for clustering and high availability in Oracle database environments.

Top Benefits of Real Application Clusters (RAC)
- Ability to spread CPU load across multiple servers
- Continuous Availability / High Availability (HA)
– Protection from single instance failures
– Protection from single server failures
- RAC can take advantage of larger SGA sizes than can be accommodated by a single instance commodity server
- Scalability
Oracle RAC installation steps are a bit long. Firstly, you have to adjust system parameters of operating system on both node and create asm disks. After, you can start to install of grid infrastructure. You can create disk groups for DATA and FRA disk groups after install grid. Finally you can install Oracle RAC database on grid infrastructure and ASM disks. I divide the stages of installation four steps.
First Step : Configure Operation System
1. Upgrade Packages
On each node
yum upgrade
yum install oracleasm-support
2. Selinux Disable
On each node
You can do disabled or permissive
vi /etc/selinux/config
SELINUX=disabled
3. Firewall Close and Disable
On each node
You can open after installation,but you have to give permission to necessery ports.
systemctl stop firewalld.service
systemctl disable firewalld.service
4. Create Users
On each node
Group and user ids have to be the same.
groupadd –g 501 oinstall
groupadd –g 502 dba
groupadd –g 503 oper
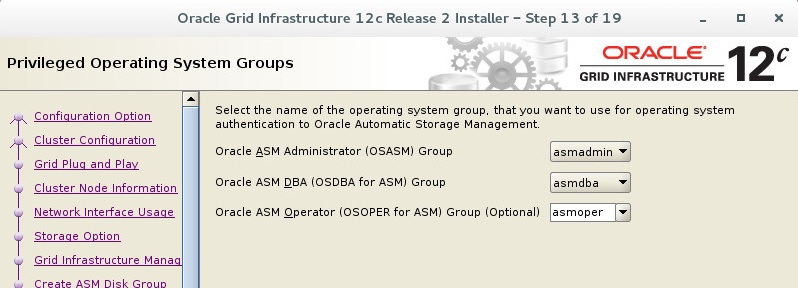
groupadd –g 504 asmadmin
groupadd –g 505 asmdba
groupadd –g 506 asmoper
useradd –u 502 –g oinstall –G dba,asmdba,oper oracle
passwd oracle
useradd –u 501 –g oinstall –G asmadmin,asmoper,asmdba grid
passwd grid
5. Configure Bash Profile of Users.
Oracle user bash_profile on node 1
vi .bash_profile
# Oracle Settings
export TMP=/tmp
export TMPDIR=$TMP
export ORACLE_HOSTNAME=ractest12c01.sm.gov.tr
export ORACLE_UNQNAME=RACTEST
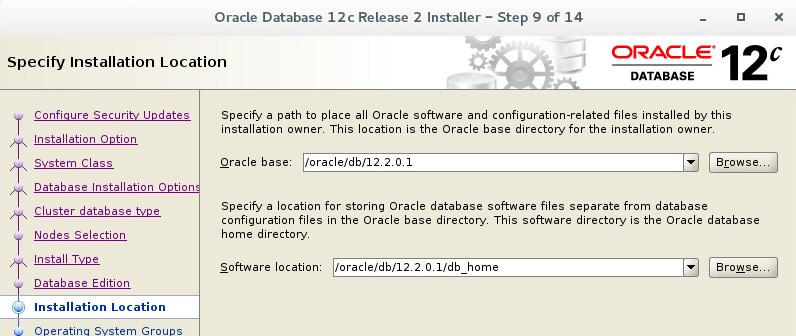
export ORACLE_BASE=/oracle/db/12.2.0.1
export DB_HOME=$ORACLE_BASE/db_home
export ORACLE_HOME=$DB_HOME
export ORACLE_SID=RACTEST1
export ORACLE_TERM=xterm
export BASE_PATH=/usr/sbin:$PATH
export PATH=$ORACLE_HOME/bin:$BASE_PATH
export LD_LIBRARY_PATH=$ORACLE_HOME/lib:/lib:/usr/lib
export CLASSPATH=$ORACLE_HOME/JRE:$ORACLE_HOME/jlib:$ORACLE_HOME/rdbms/jlib
alias home=’cd /oracle/db/12.2.0.1/db_home’
Oracle user bash_profile on node 2
vi .bash_profile
# Oracle Settings
export TMP=/tmp
export TMPDIR=$TMP
export ORACLE_HOSTNAME=ractest12c02.sm.gov.tr
export ORACLE_UNQNAME=RACTEST
export ORACLE_BASE=/oracle/db/12.2.0.1
export DB_HOME=$ORACLE_BASE/db_home
export ORACLE_HOME=$DB_HOME
export ORACLE_SID=RACTEST2
export ORACLE_TERM=xterm
export BASE_PATH=/usr/sbin:$PATH
export PATH=$ORACLE_HOME/bin:$BASE_PATH
export LD_LIBRARY_PATH=$ORACLE_HOME/lib:/lib:/usr/lib
export CLASSPATH=$ORACLE_HOME/JRE:$ORACLE_HOME/jlib:$ORACLE_HOME/rdbms/jlib
Grid user bash_profile on node 1
# Oracle Settings
export TMP=/tmp
export TMPDIR=$TMP
export ORACLE_HOSTNAME=ractest12c01.sm.gov.tr
export ORACLE_UNQNAME=RACTEST
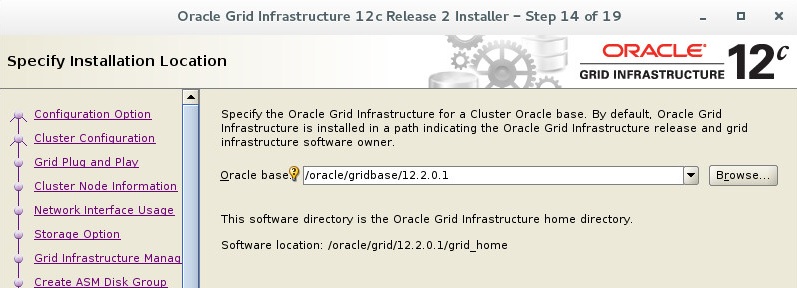
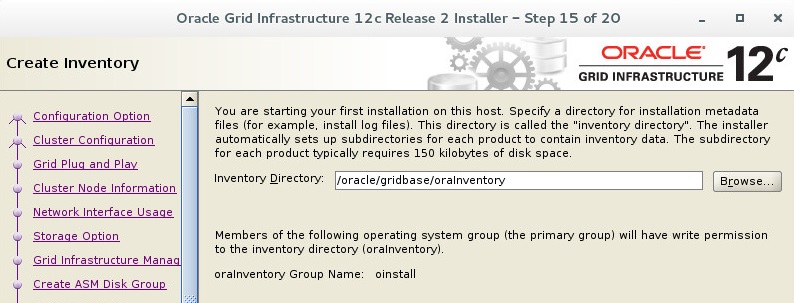
export ORACLE_BASE=/oracle/gridbase/12.2.0.1
export GRID_BASE=/oracle/gridbase/12.2.0.1
export GRID_HOME=/oracle/grid/12.2.0.1/grid_home
export ORACLE_HOME=/oracle/grid/12.2.0.1/grid_home
export ORACLE_SID=+ASM1
export ORACLE_TERM=xterm
export BASE_PATH=/usr/sbin:$PATH
export PATH=$ORACLE_HOME/bin:$BASE_PATH
export LD_LIBRARY_PATH=$ORACLE_HOME/lib:/lib:/usr/lib
export CLASSPATH=$ORACLE_HOME/JRE:$ORACLE_HOME/jlib:$ORACLE_HOME/rdbms/jlib
alias home=’cd /oracle/grid/12.2.0.1/grid_home’
Grid user bash_profile on node 2
# Oracle Settings
export TMP=/tmp
export TMPDIR=$TMP
export ORACLE_HOSTNAME=ractest12c02.sm.gov.tr
export ORACLE_UNQNAME=RACTEST
export ORACLE_BASE=/oracle/gridbase/12.2.0.1
export GRID_BASE=/oracle/gridbase/12.2.0.1
export GRID_HOME=/oracle/grid/12.2.0.1/grid_home
export ORACLE_HOME=/oracle/grid/12.2.0.1/grid_home
export ORACLE_SID=+ASM2
export ORACLE_TERM=xterm
export BASE_PATH=/usr/sbin:$PATH
export PATH=$ORACLE_HOME/bin:$BASE_PATH
export LD_LIBRARY_PATH=$ORACLE_HOME/lib:/lib:/usr/lib
export CLASSPATH=$ORACLE_HOME/JRE:$ORACLE_HOME/jlib:$ORACLE_HOME/rdbms/jlib
alias home=’cd /oracle/grid/12.2.0.1/grid_home’
6. Create Directories
on each node
mkdir -p /oracle/grid/12.2.0.1/grid_home
mkdir -p /oracle/grid/12.2.0.1/log
mkdir -p /oracle/gridbase/12.2.0.1/
mkdir -p /oracle/db/12.2.0.1/db_home
chown -R oracle.oinstall /oracle/
chown -R grid.oinstall /oracle/grid*
chmod -R 775 /oracle/
7. Configure ASM Disks
*Your disk name can be different from I used. I configured sdc, sdd,sde and sdf disks for asm on my test suite. These sd* disks can be different on your system.
on each node
with root user.
oracleasm configure -i
Answers of Questions;
grid
asmadmin
y
y
After finish configuration you can make init with below command.
oracleasm init
on node 1
Create partition.
fdisk /dev/sdc
fdisk /dev/sdd
fdisk /dev/sde
fdisk /dev/sdf
oracleasm createdisk DATA1 /dev/sdc1
oracleasm createdisk FRA1 /dev/sdd1
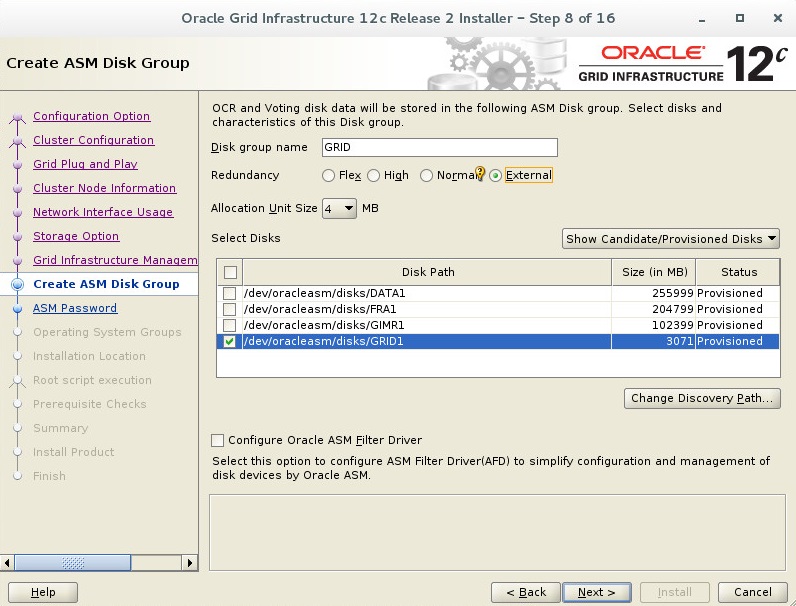
oracleasm createdisk GRID1 /dev/sde1
oracleasm createdisk GIMR1 /dev/sdf1
on each node for control
oracleasm scandisks
oracleasm listdisks
You have to see disks on each node with oracleasm listdisks command.
ll /dev/oracleasm/disks/
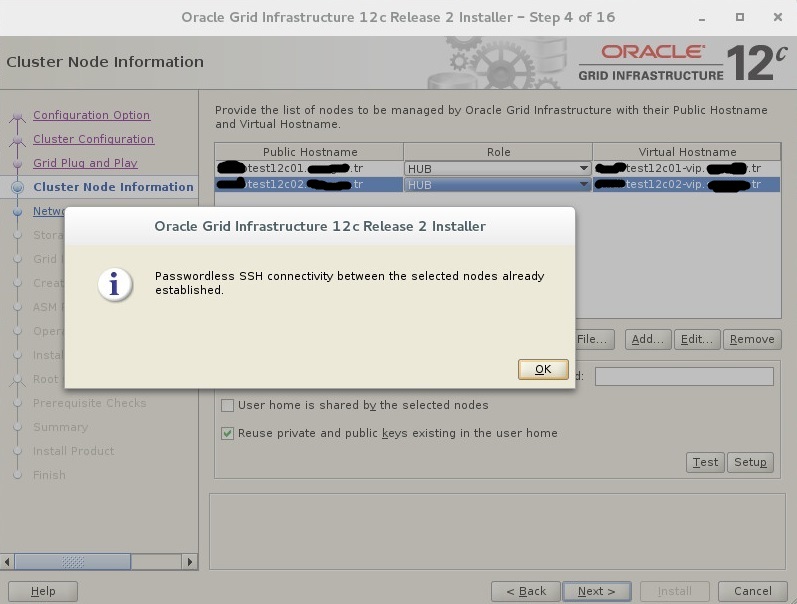
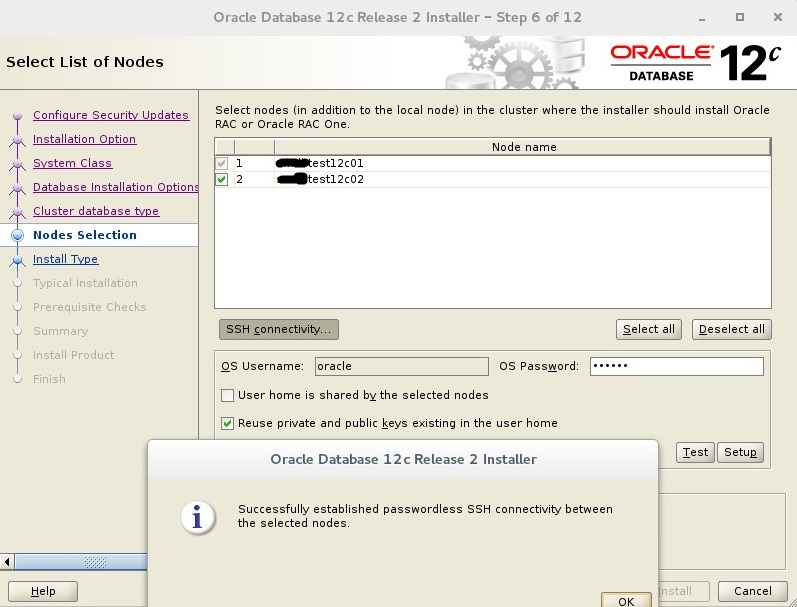
8. Configure Passwordless SSH Connection (optional)
You can configure ssh passwordless connection. Oracle installation step can make this step, but sometimes you can get an error.
You can find how to do this step here.
9. Chrony NTP Configuration
Chrony plugin came with Oracle Linux 7 version for ntp sync. You can write your ntp server information in /etc/chrony.conf file.
on each node
vi /etc/chrony.conf
server ntp.yourdomain
systemctl restart chronyd.service
systemctl enable chronyd.service
10. Configure Hosts File
on each node
You can write your domain name info instead of yourdomain text. Also, you can give IP addresses as your IP structure. priv and public network subnet have to be different.
vi /etc/hosts
20.10.4.141 ractest12c01 ractest12c01.yourdomain
20.10.4.142 ractest12c02 ractest12c02.yourdomain
20.10.4.143 ractest12c01-vip ractest12c01-vip.yourdomain
20.10.4.144 ractest12c02-vip ractest12c02-vip.yourdomain
20.10.4.145 ractest12c-scan ractest12c-scan.yourdomain
20.10.4.146 ractest12c-scan ractest12c-scan.yourdomain
20.10.4.147 ractest12c-scan ractest12c-scan.yourdomain
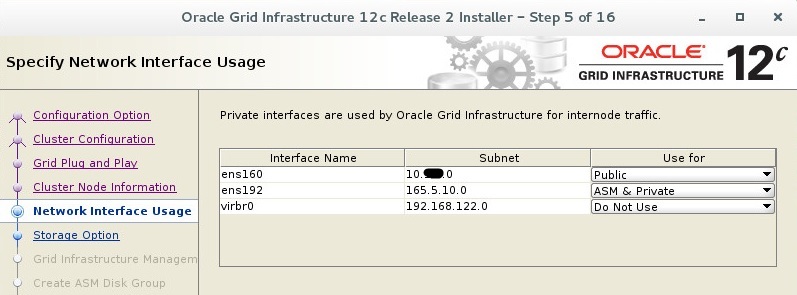
165.5.10.1 ractest12c01-priv ractest12c01-priv.yourdomain
165.5.10.2 ractest12c02-priv ractest12c02-priv.yourdomain
11. DNS Register (optional)
If you do not want to take an warning at last step of installation, you can add your alias to your domain server.
Also, you can configure dns information of nodes in /etc/resolf.conf file.
12. Preinstallation Package Intallation
on each node
yum install oracle-database-server-12cR2-preinstall
reboot
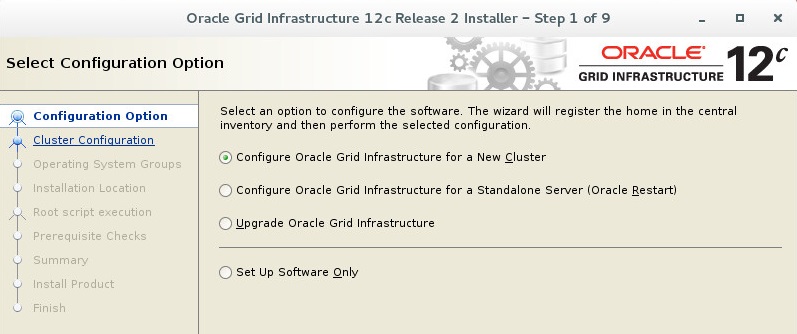
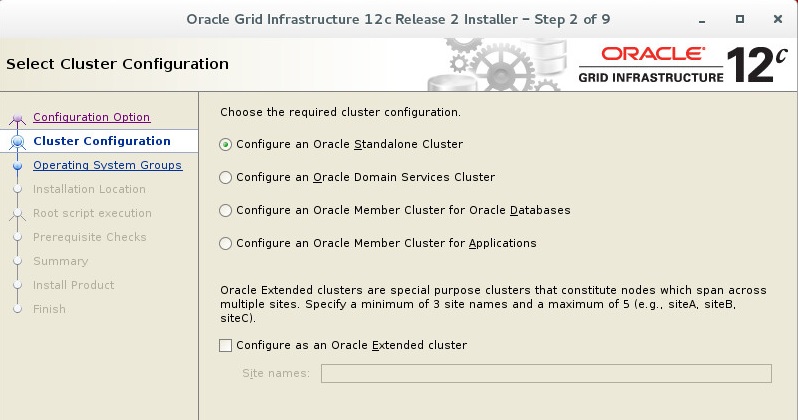
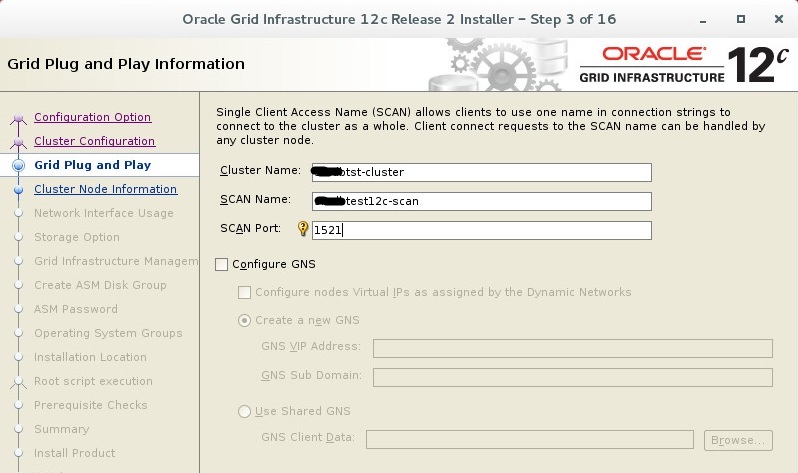
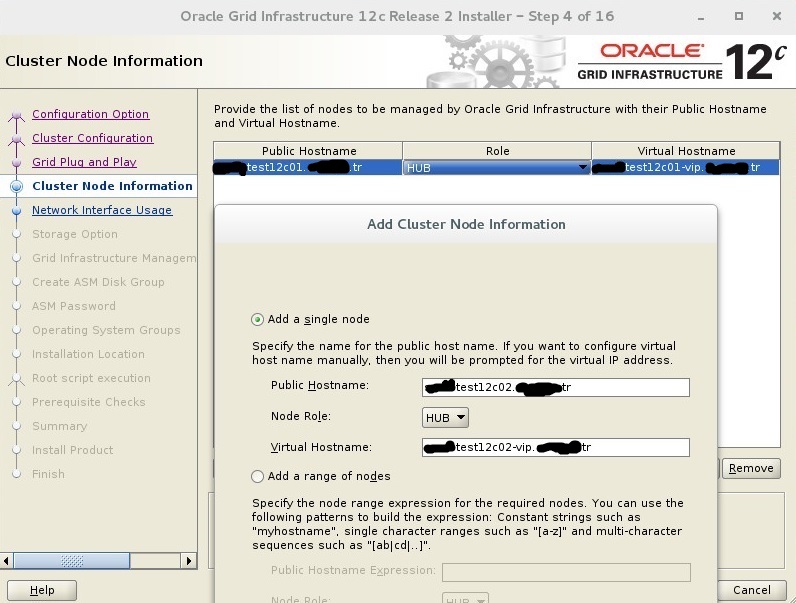
Second Step : Install Grid Infrastructure
You have to copy your grid installation files to grid_home. I recommend that you copy grid zip file to grid home and change owner of zip file, and unzip with grid user.
Copy and Unzip Grid Files
cp linuxx64_12201_grid_home.zip /oracle/grid/12.2.0.1/grid_home
chown grid.oinsall linuxx64_12201_grid_home.zip
su – grid
unzip linuxx64_12201_grid_home.zip
Display Config and Start Grid Installation
su –
export DISPLAY=:0.0
xhost +
su – grid
export DISPLAY=:0.0
xhost +
cd /$GRID_HOME/
./grid_Setup.sh
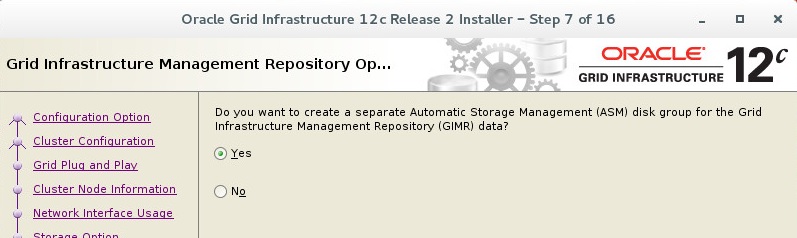
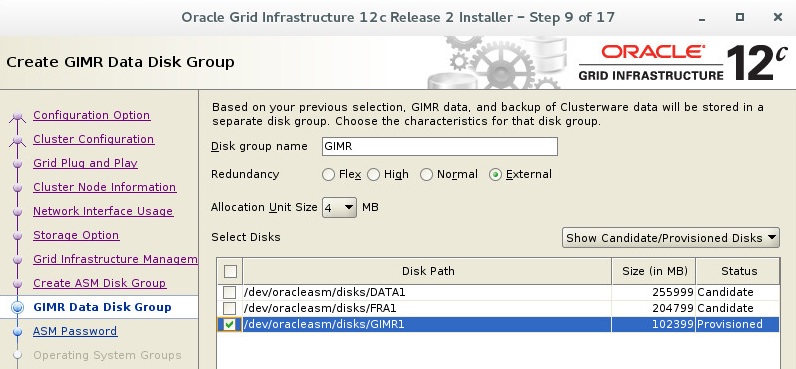
GIMR came with Oracle 12c version. Every Oracle Standalone Cluster and Oracle Domain Services Cluster contains a Grid Infrastructure Management Repository (GIMR), or the Management Database (MGMTDB).
The Grid Infrastructure Management Repository (GIMR) is a multitenant database with a pluggable database (PDB) for the GIMR of each cluster. The GIMR stores the following information about the cluster:
- Real time performance data the Cluster Health Monitor collects
- Fault, diagnosis, and metric data the Cluster Health Advisor collects
- Cluster-wide events about all resources that Oracle Clusterware collects
- CPU architecture data for Quality of Service Management (QoS)
- Metadata required for Rapid Home Provisioning
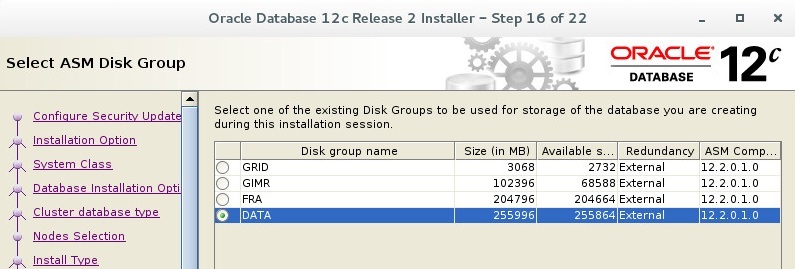
You have to give at least 40 GB size to GIMR data. I gave 100 GB this system and gave separate disk area for GIMR db.


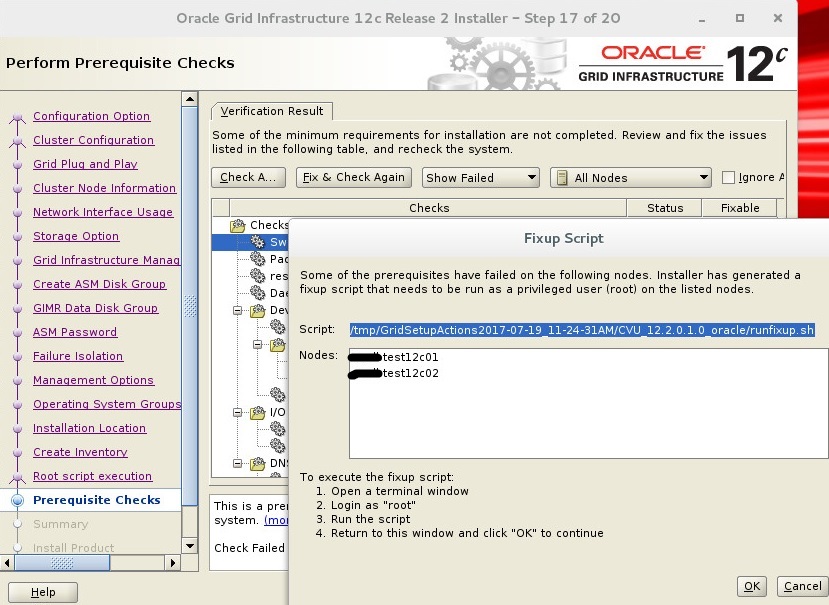
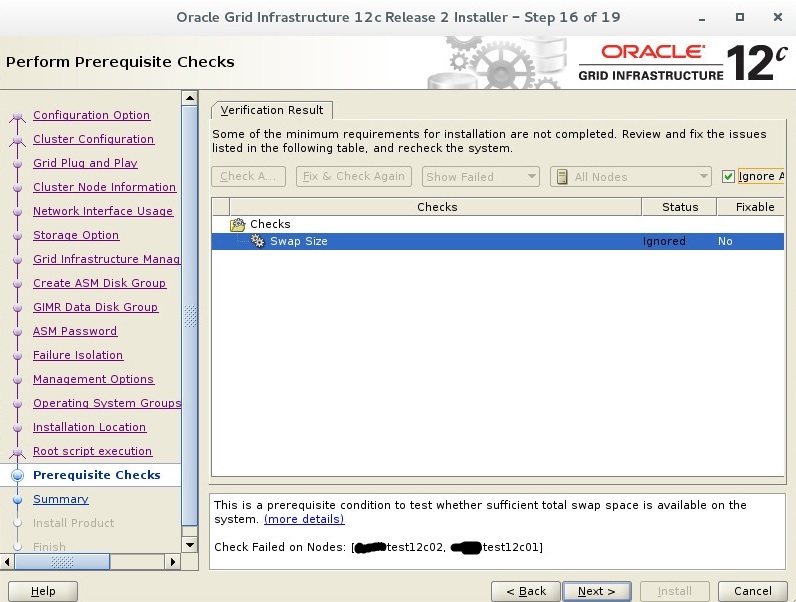
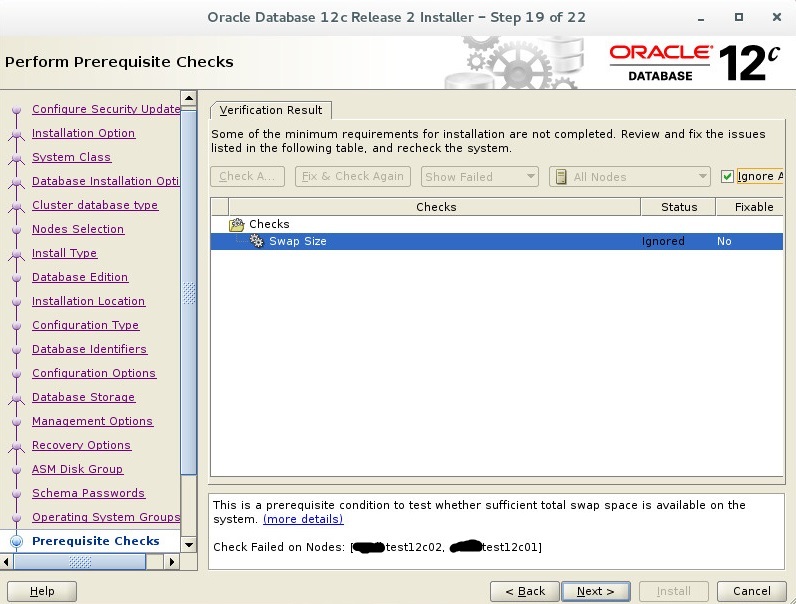
Fix & Check Again button creates fix scripts to resolve warnings. You have to run this scripts on both node to resolve warnings.


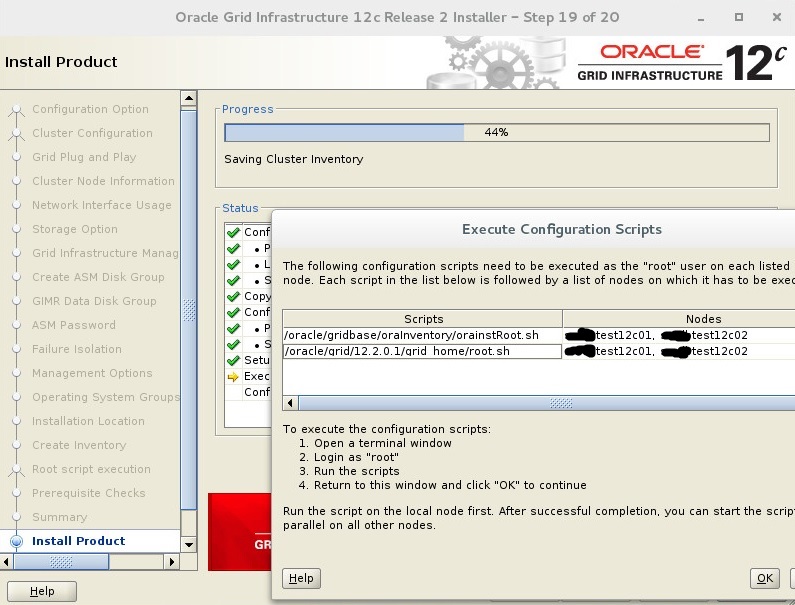
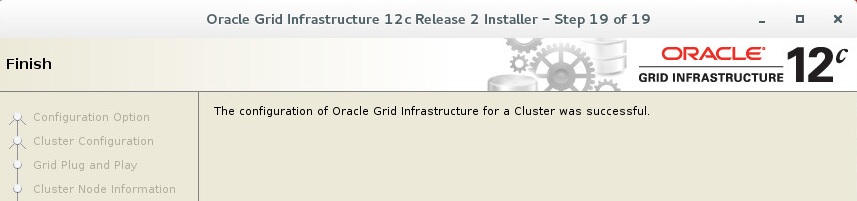
You have to run this scripts on both node respectively. The run can be a bit long. Scripts passes 19 steps, you can see these steps while running scripts. You can click OK, after run scripts on each node. If you do not get an error, you can see this screen.
You can check your grid status with crs_stat -t and crsctl stat res -t commands with grid user.
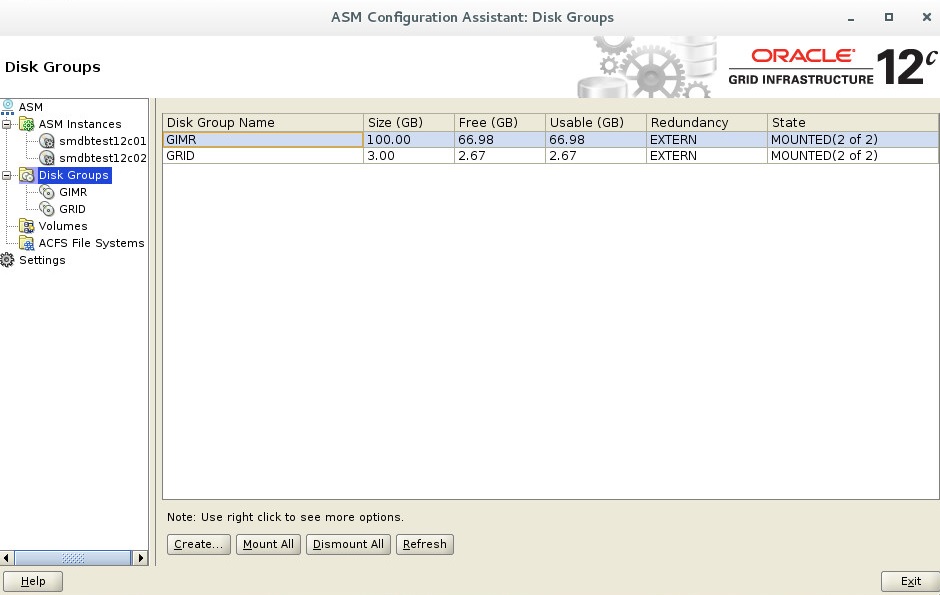
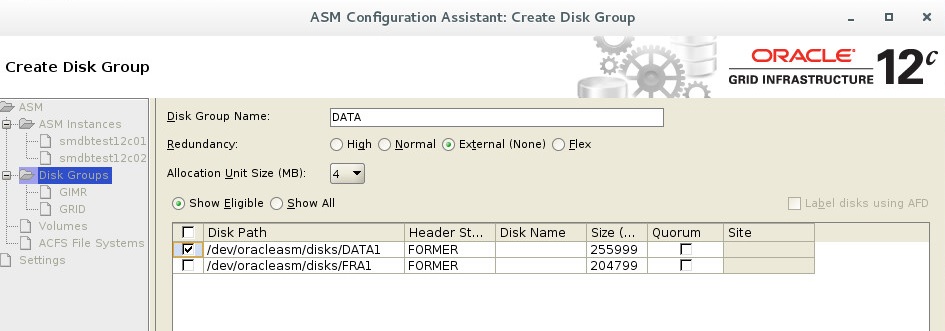
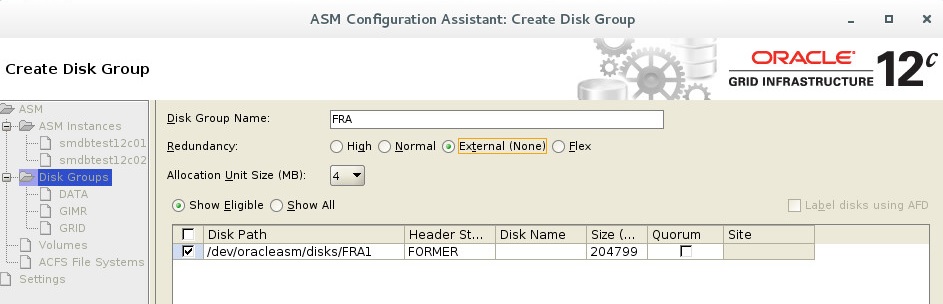
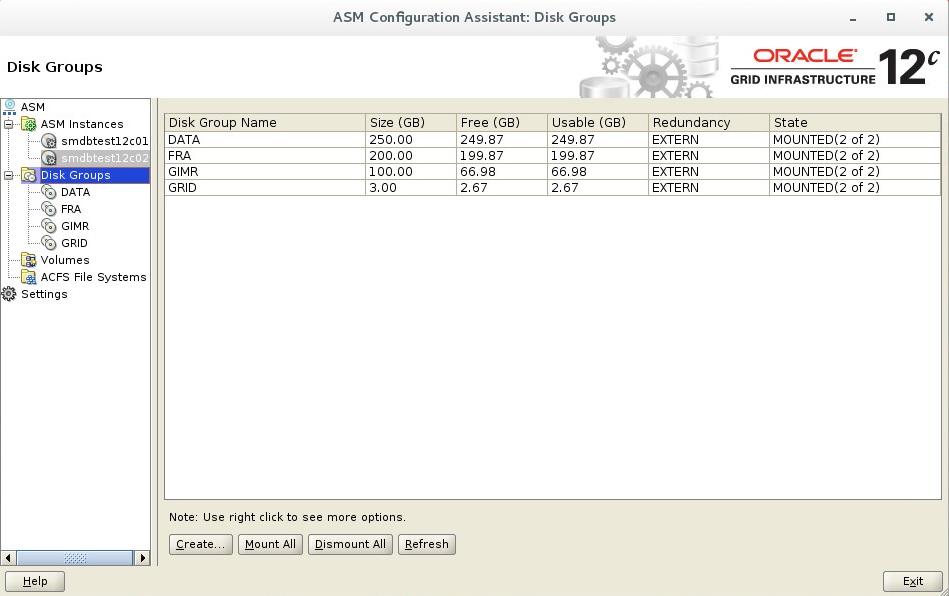
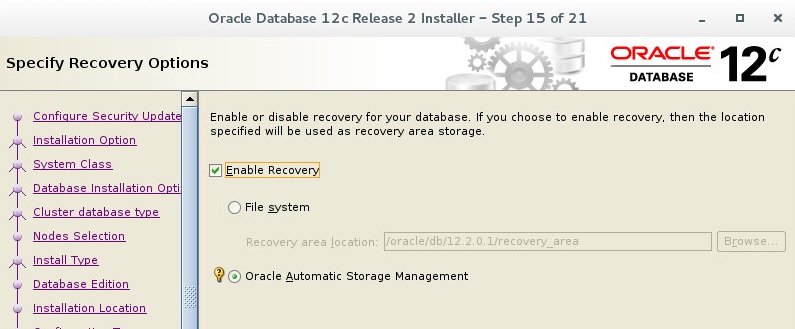
Third Step : Create ASM Disk Group For DATA and FRA
Display Config and Start ASMCA
su –
export DISPLAY=:0.0
xhost +
su – grid
export DISPLAY=:0.0
xhost +
asmca

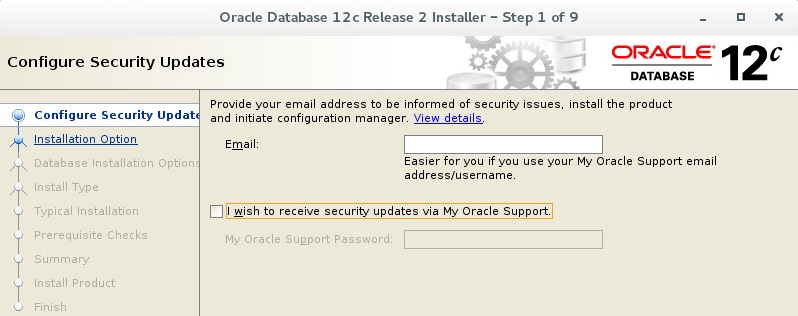
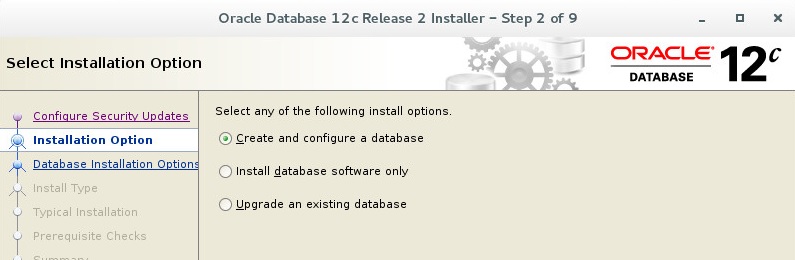
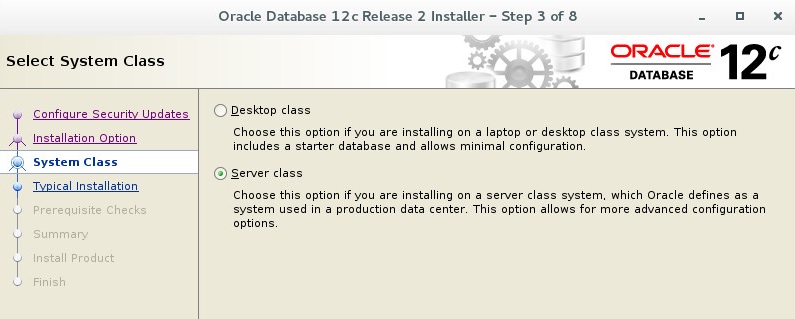
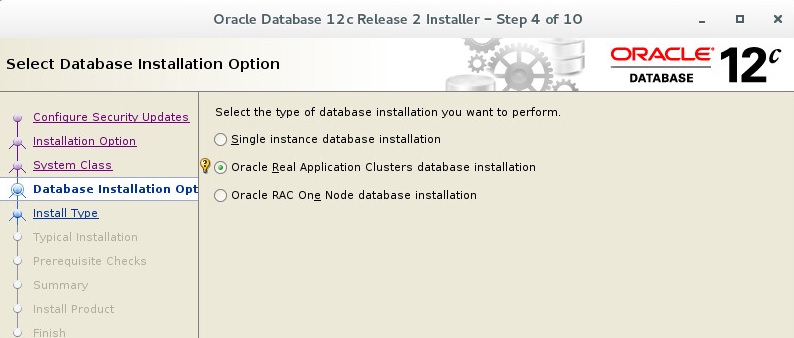
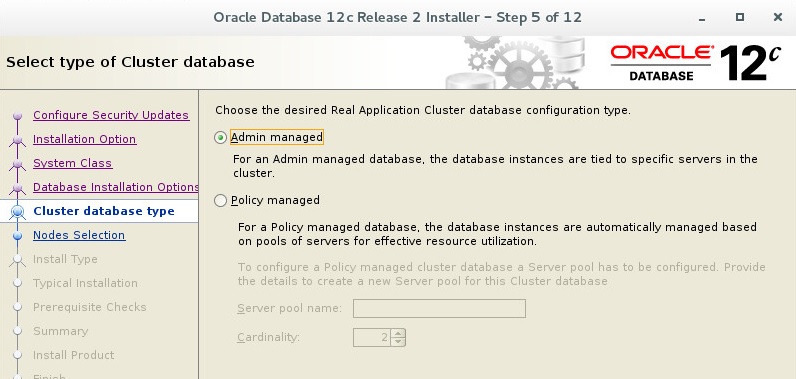
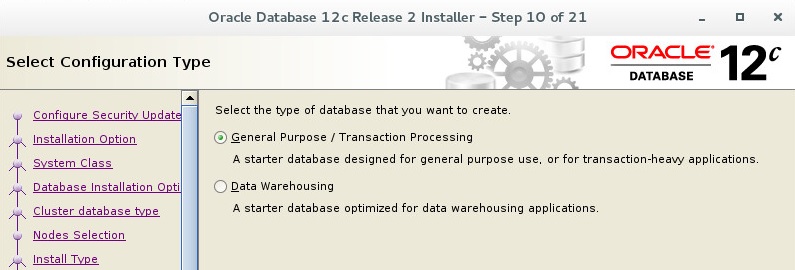
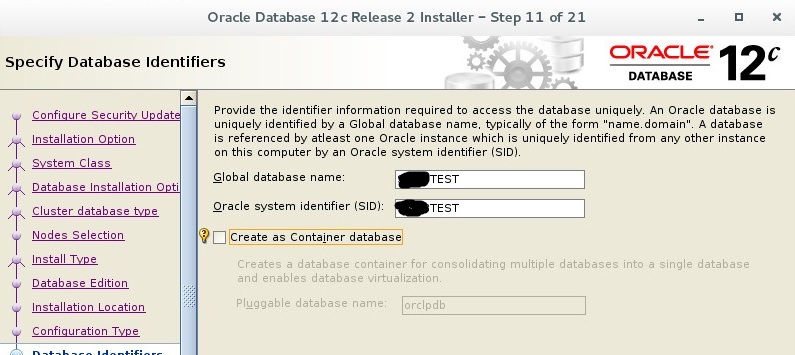
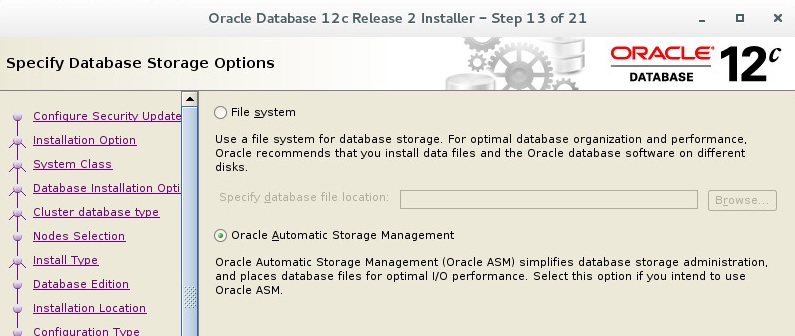
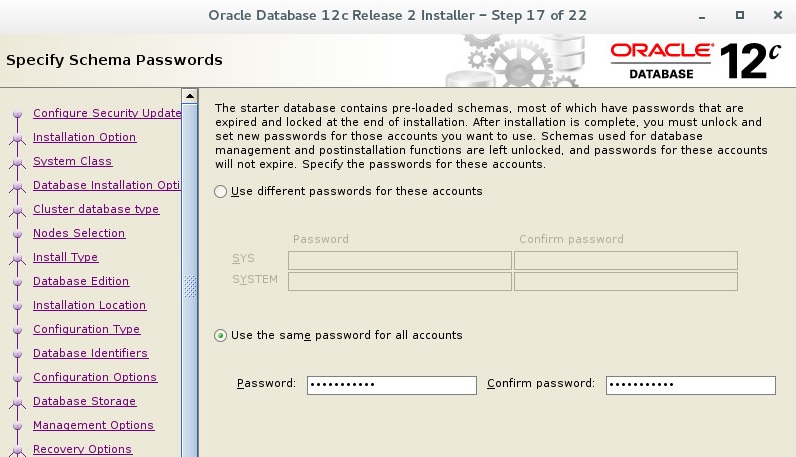
Fourth Step : Install Database
You can unzip database file under /tmp/ and you have to give permission oracle user.
chown oracle.oinstall –R /tmp/database/
Display Config and Start Database Installation
su –
export DISPLAY=:0.0
xhost +
su – oracle
export DISPLAY=:0.0
xhost +
cd /tmp/database/
./runInstaller
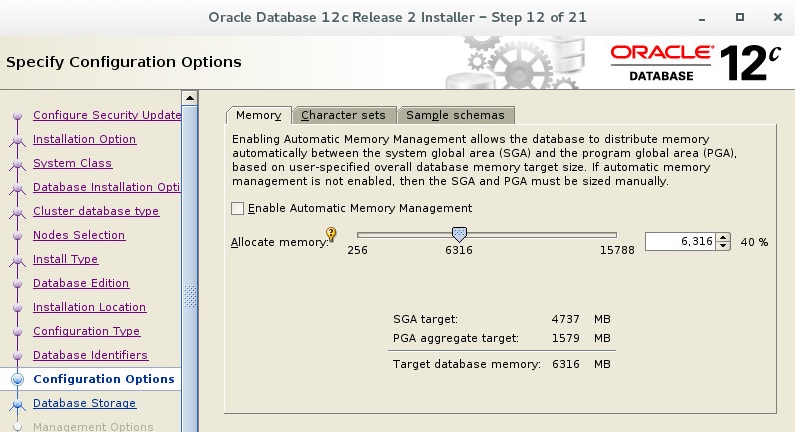
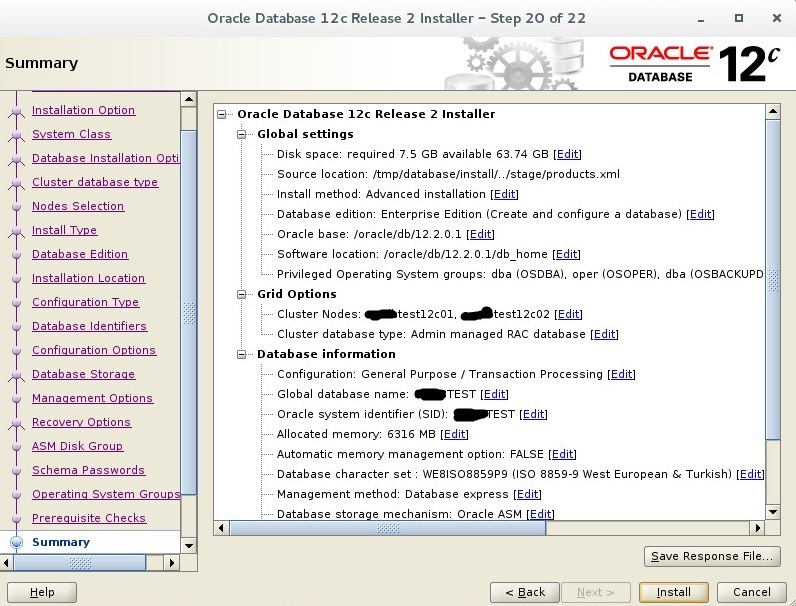
We usually use WE8ISO8859P9 characterset to support Turkish characters. You can select another one that suits you.


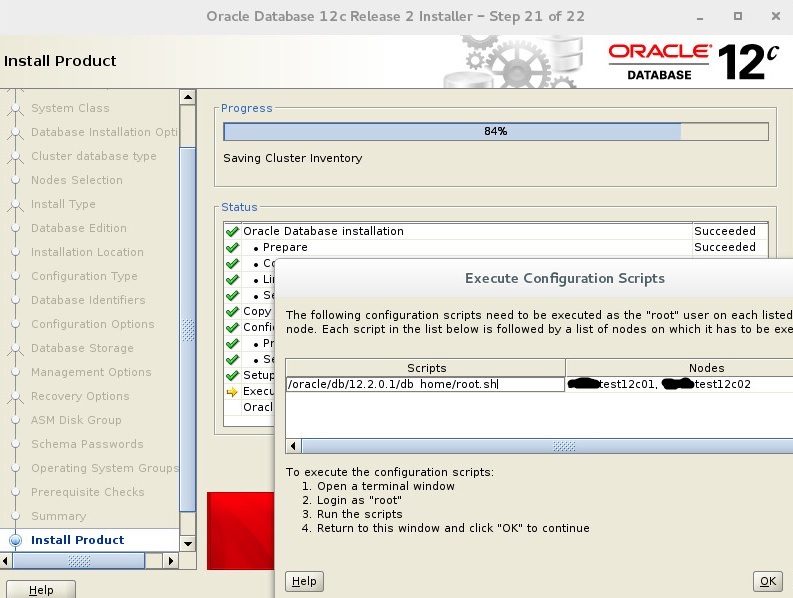
You have to run this scripts on both node respectively. The run can be a bit long. Scripts passes 19 steps, you can see these steps while running scripts. You can click OK, after run scripts on each node. If you do not get an error, you can see this screen.
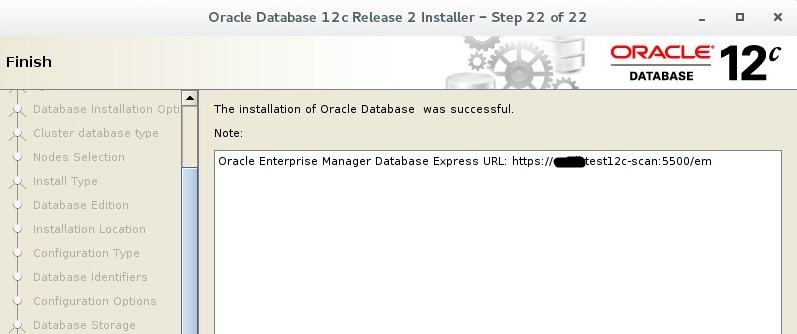
Installation finished.
 Follow
Thanks for the share
Thanks a lot, the world need more people like you