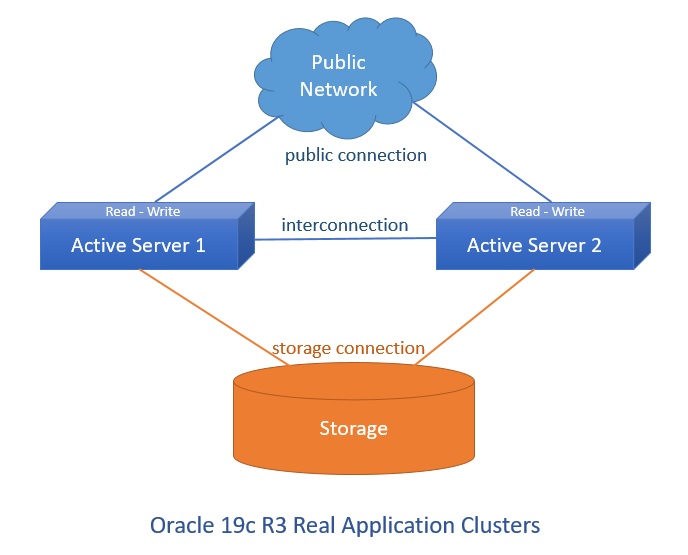
Oracle Real Application Clusters (RAC) provides high availability (HA) and scalability to the Oracle Database without requiring any application changes. Oracle RAC allows multiple instances running on different servers to access the same physical database stored on shared storage. Database spans multiple hardware systems and yet appears as a single unified database to the application. This enables utilization of commodity hardware to reduce total cost of ownership and to provide a scalable computing environment that supports various application workloads.
Top Benefits of Real Application Clusters (RAC)
- Ability to spread CPU load across multiple servers
- Continuous Availability / High Availability (HA)
– Protection from single instance failures
– Protection from single server failures
- RAC can take advantage of larger SGA sizes than can be accommodated by a single instance commodity server
- Scalability
I will use VMware virtualization to servers. You can add disk for oracle asm storage with different iscsi driver. You have to adjust iscsi driver as virtual.
Oracle 19c RAC installation steps are a bit long. Firstly, you have to adjust system parameters of operating system on both node and create asm disks. After, you can start to install of grid infrastructure. You can create disk groups for DATA and FRA disk groups after install grid. Finally you can install Oracle RAC database on grid infrastructure and ASM disks. I divide the stages of installation three steps.
First Step : Configure Operation System on Both Servers
1. Upgrade All Packages
yum upgrade
2. Selinux Disable or Permissive
You can do disabled or permissive
vi /etc/selinux/config
SELINUX=permissive
3. Firewall Stop and Disable
You can open firewall after installation, but you have to give permission to necessary ports and services.
systemctl stop firewalld.service
systemctl disable firewalld.service
4. Chrony NTP Configuration
Chrony plugin came with Oracle Linux 7 version for ntp sync. You can write your ntp server information in /etc/chrony.conf file to time sync.
on each node
vi /etc/chrony.conf
server yourntpaddress iburst
systemctl restart chronyd.service
systemctl enable chronyd.service
5. Package Installation
on each node
yum install oracle-database-preinstall-19c
yum install oracleasm-support
reboot
6. Create Oracle and Grid Users
When you run “yum install oracle-database-preinstall-19c”, oracle user created. You can see oracle user info with “id oracle” command. uid and gid have to be the same on both servers.
id oracle
uid=54321(oracle) gid=54321(oinstall) groups=54321(oinstall),54322(dba),54323(oper),54324(backupdba),54325(dgdba),54326(kmdba),54330(racdba)Also I will create new groups to grid user. And then I will create grid user with adding to new groups on both servers.
groupadd -g 54333 asmdba
groupadd -g 54334 asmoper
groupadd -g 54335 asmadmin
useradd -m -u 54341 -g oinstall -G dba,asmadmin,asmdba,asmoper -d /home/grid -s /bin/bash grid
oracle user add to asmdba group.
usermod -a -G asmdba oracle
passwd oracle
passwd grid
7. Create Directories
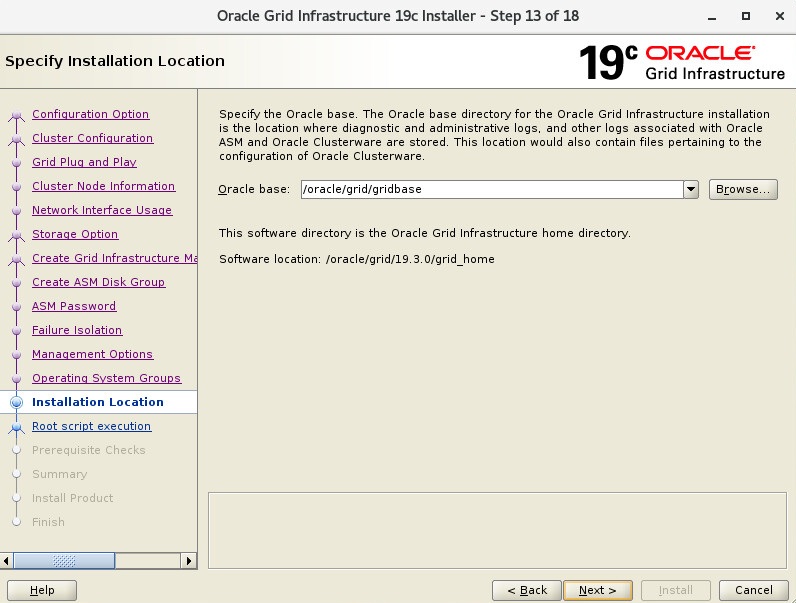
mkdir -p /oracle/grid/19.3.0/grid_home
mkdir -p /oracle/grid/gridbase/
mkdir -p /oracle/db/19.3.0/db_home
chown -R oracle.oinstall /oracle/
chown -R grid.oinstall /oracle/grid/
chmod -R 775 /oracle/
8. Configure Bash Profile of Users.
Add below parameters to bash_profiles.
Oracle user bash_profile on node 1
vi .bash_profile
# Oracle Settings
export TMP=/tmp
export TMPDIR=$TMP
export ORACLE_HOSTNAME=oracle19c1.yourdomain
export ORACLE_UNQNAME=ORA19C
export ORACLE_BASE=/oracle/db/19.3.0
export DB_HOME=$ORACLE_BASE/db_home
export ORACLE_HOME=$DB_HOME
export ORACLE_SID=ORA19C1
export ORACLE_TERM=xterm
export PATH=/usr/sbin:/usr/local/bin:$PATH
export PATH=$ORACLE_HOME/bin:$PATH
export LD_LIBRARY_PATH=$ORACLE_HOME/lib:/lib:/usr/lib
export CLASSPATH=$ORACLE_HOME/jlib:$ORACLE_HOME/rdbms/jlib
Oracle user bash_profile on node 2
vi .bash_profile
# Oracle Settings
export TMP=/tmp
export TMPDIR=$TMP
export ORACLE_HOSTNAME=oracle19c2.yourdomain
export ORACLE_UNQNAME=ORA19C
export ORACLE_BASE=/oracle/db/19.3.0
export DB_HOME=$ORACLE_BASE/db_home
export ORACLE_HOME=$DB_HOME
export ORACLE_SID=ORA19C2
export ORACLE_TERM=xterm
export PATH=/usr/sbin:/usr/local/bin:$PATH
export PATH=$ORACLE_HOME/bin:$PATH
export LD_LIBRARY_PATH=$ORACLE_HOME/lib:/lib:/usr/lib
export CLASSPATH=$ORACLE_HOME/jlib:$ORACLE_HOME/rdbms/jlib
Grid user bash_profile on node 1
vi .bash_profile
# Grid Settings
export TMP=/tmp
export TMPDIR=$TMP
export ORACLE_HOSTNAME=oracle19c1.yourdomain
export ORACLE_BASE=/oracle/grid/gridbase
export ORACLE_HOME=/oracle/grid/19.3.0/grid_home
export GRID_BASE=/oracle/grid/gridbase
export GRID_HOME=/oracle/grid/19.3.0/grid_home
export ORACLE_SID=+ASM1
export ORACLE_TERM=xterm
export PATH=/usr/sbin:/usr/local/bin:$PATH
export PATH=$ORACLE_HOME/bin:$PATH
export LD_LIBRARY_PATH=$ORACLE_HOME/lib:/lib:/usr/lib
export CLASSPATH=$ORACLE_HOME/jlib:$ORACLE_HOME/rdbms/jlib
Grid user bash_profile on node 2
vi .bash_profile
# Grid Settings
export TMP=/tmp
export TMPDIR=$TMP
export ORACLE_HOSTNAME=oracle19c2.yourdomain
export ORACLE_BASE=/oracle/grid/gridbase
export ORACLE_HOME=/oracle/grid/19.3.0/grid_home
export GRID_BASE=/oracle/grid/gridbase
export GRID_HOME=/oracle/grid/19.3.0/grid_home
export ORACLE_SID=+ASM2
export ORACLE_TERM=xterm
export PATH=/usr/sbin:/usr/local/bin:$PATH
export PATH=$ORACLE_HOME/bin:$PATH
export LD_LIBRARY_PATH=$ORACLE_HOME/lib:/lib:/usr/lib
export CLASSPATH=$ORACLE_HOME/jlib:$ORACLE_HOME/rdbms/jlib
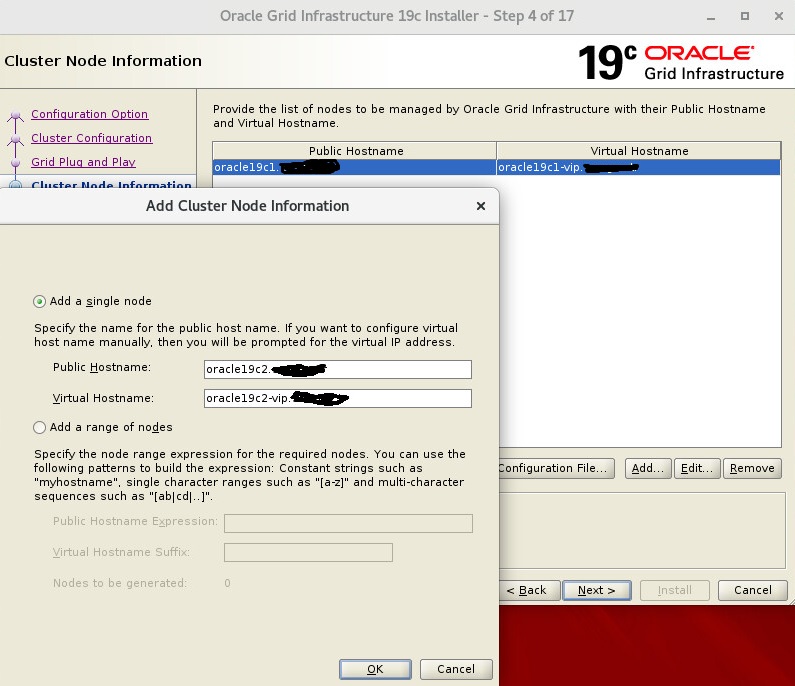
9. Configure Hosts File
on each node
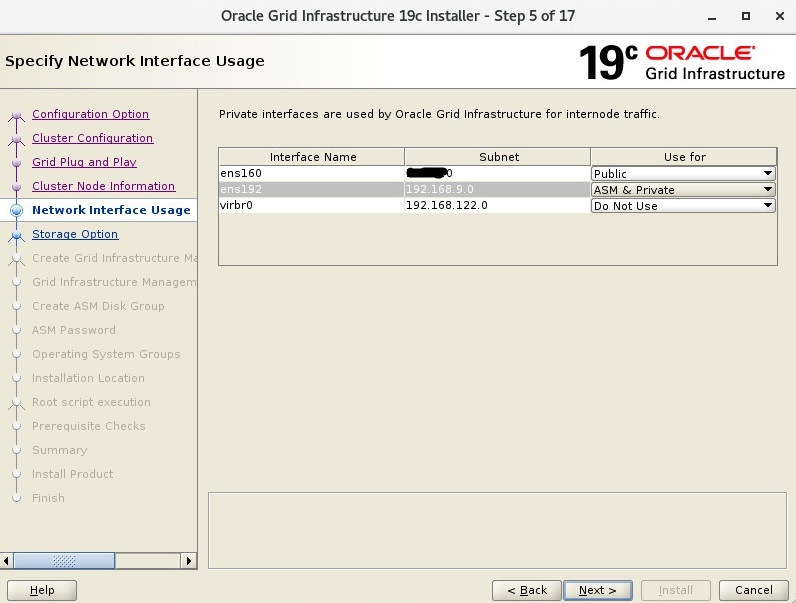
You can also write your domain name info. You can give IP addresses as your IP structure. priv and public network subnet have to be different.
vi /etc/hosts
11.12.13.15 oracle19c1 oracle19c1.yourdomain
11.12.13.16 oracle19c2 oracle19c2.yourdomain
11.12.13.17 oracle19c1-vip oracle19c1-vip.yourdomain
11.12.13.18 oracle19c2-vip oracle19c2-vip.yourdomain
11.12.13.19 oracle19c-scan oracle19c-scan.yourdomain
11.12.13.20 oracle19c-scan oracle19c-scan.yourdomain
11.12.13.21 oracle19c-scan oracle19c-scan.yourdomain
192.168.9.11 oracle19c1-priv oracle19c1-priv.yourdomain
192.168.9.12 oracle19c2-priv oracle19c2-priv.yourdomain
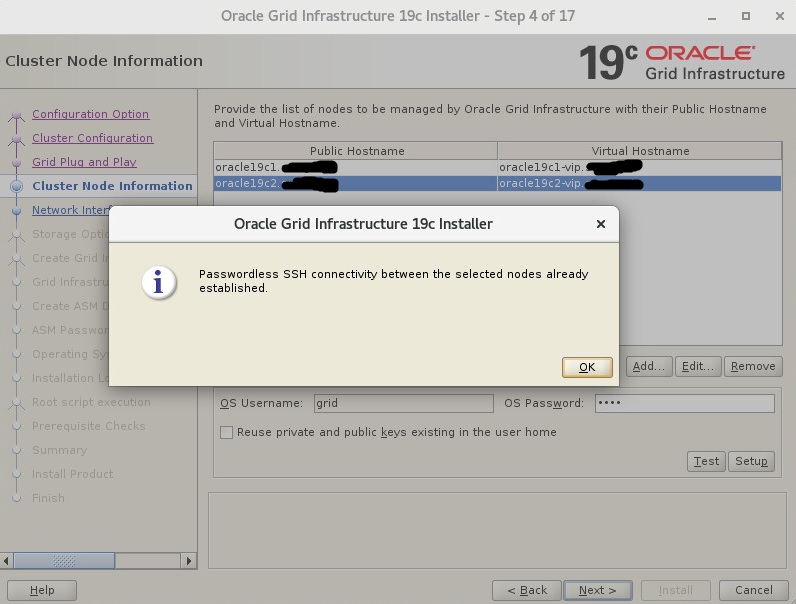
10. Configure Passwordless SSH Connection
You have to configure ssh passwordless connection for oracle and grid user.
You can find how to do this step here.
11. DNS Register
If you do not want to take an warning at last step of installation, you can add your alias to your domain server.
Also, you can configure dns information of nodes in /etc/resolf.conf file.
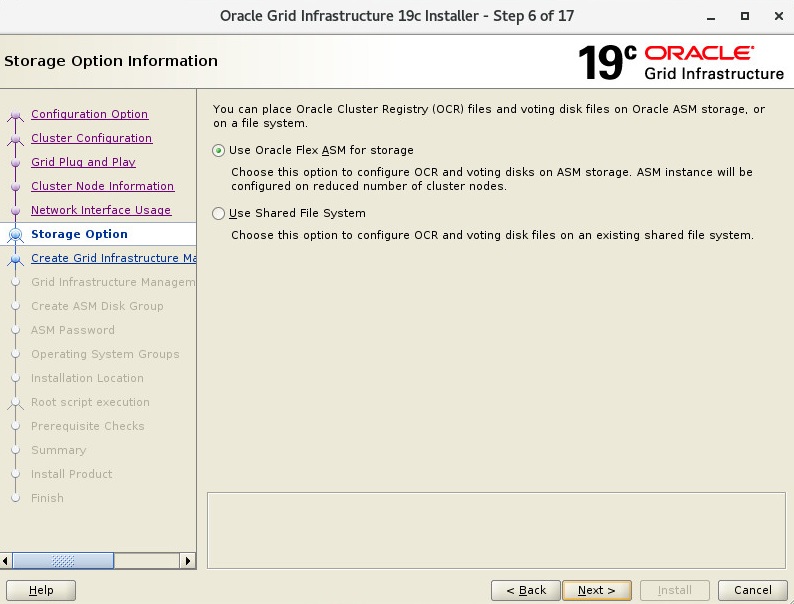
12. Configure ASM Disks
Your disk name can be different from I used. I configured sdc, sdd,sde disks for asm on my test suite. These sd* disks can be different on your system.
Configure oracleasm with root user on both servers.
oracleasm configure -i
Answers of Questions;
grid
asmadmin
y
y
After finish configuration you can make init with below command.
oracleasm init
Create partition and asm disk on only first server.
fdisk /dev/sdc
fdisk /dev/sdd
fdisk /dev/sde
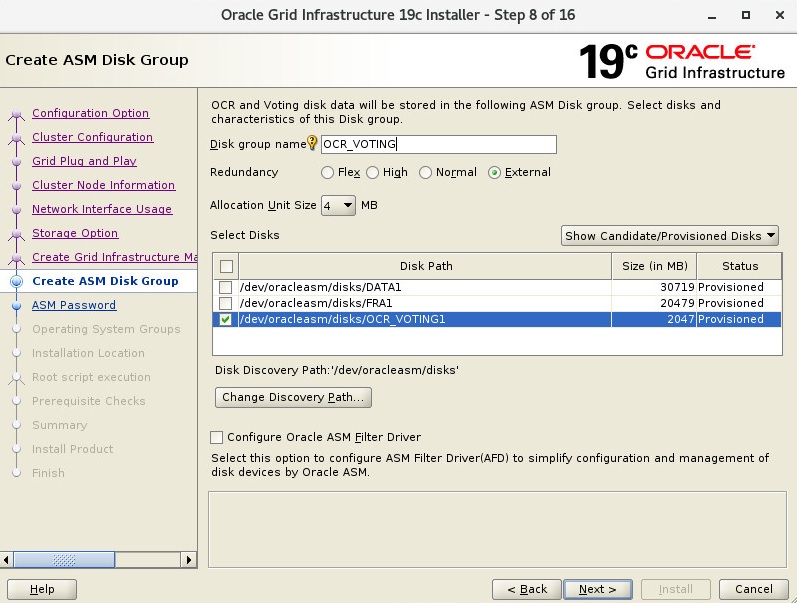
oracleasm createdisk DATA1 /dev/sdb1
oracleasm createdisk FRA1 /dev/sdc1
oracleasm createdisk OCR_VOTING1 /dev/sdd1
You can use scandisks and listdisks to control on both servers.
oracleasm scandisks
oracleasm listdisks
Second Step : Install Grid Infrastructure
You have to copy your grid installation files to grid_home. I recommend that you copy grid zip file to grid home and change owner of zip file, and unzip with grid user.
1. Copy and Unzip Grid Files
cp LINUX.X64_193000_grid_home.zip /oracle/grid/19.3.0/grid_home/
chown grid.oinstall LINUX.X64_193000_grid_home.zip
su – grid
unzip LINUX.X64_193000_grid_home.zip
2. Display Config and Start Grid Installation
su –
export DISPLAY=:0.0
xhost +
su – grid
export DISPLAY=:0.0
xhost +
cd /$GRID_HOME/
./grid_Setup.sh
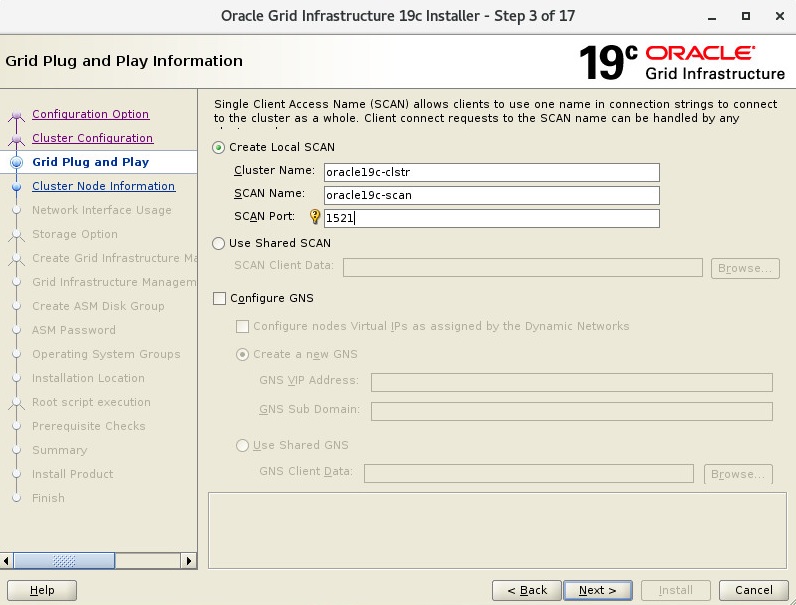
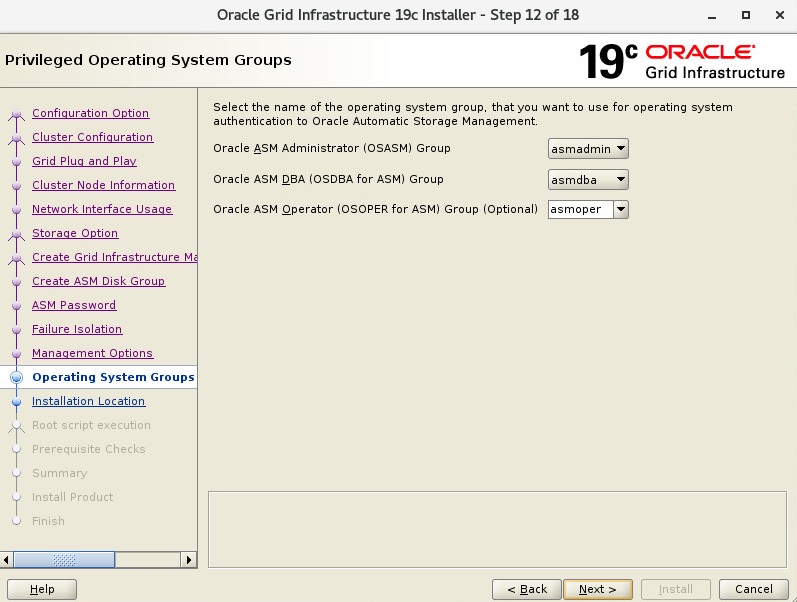
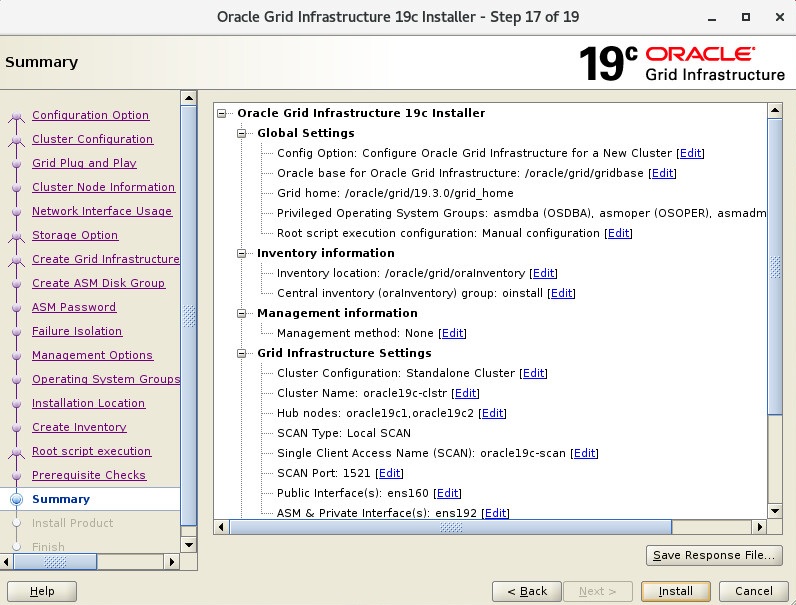
3. Grid Infrastructure Installation Steps to RAC
If you want to install Grid Infrastructure Management Repository, you can mark Yes. You have to give about 100 GB area to GIMR if you mark.
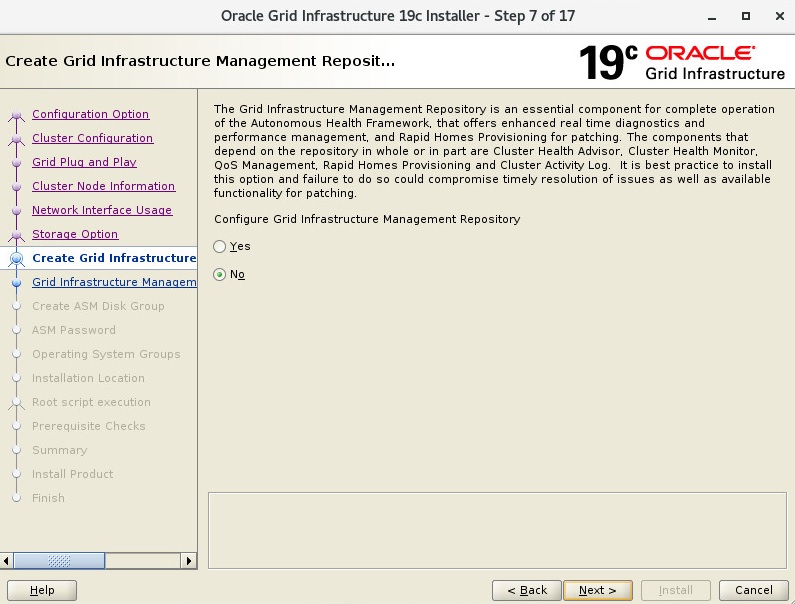
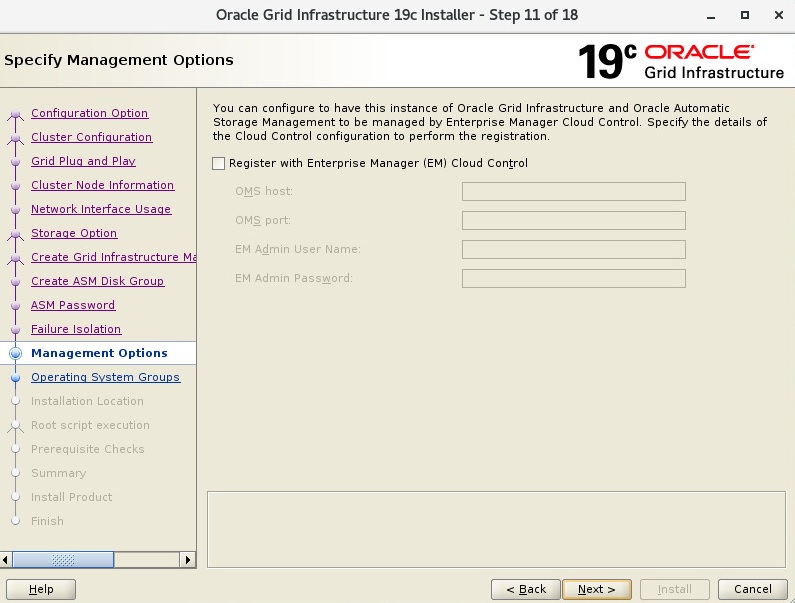
I unmarked automatically run but screen shot stayed as marked. You can mark or unmark, it is your decision.
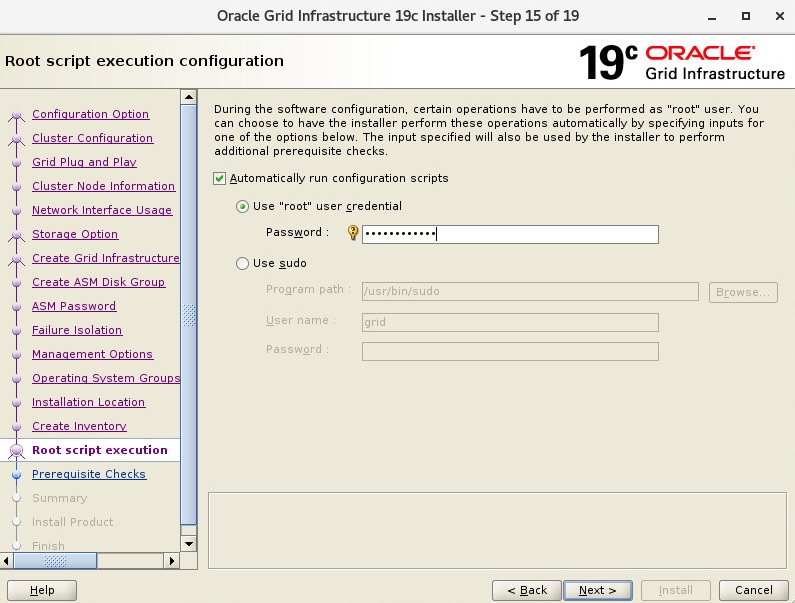
Oracle can fix some warnings with runfixup.sh script. You have to run this script on both nodes with root user.
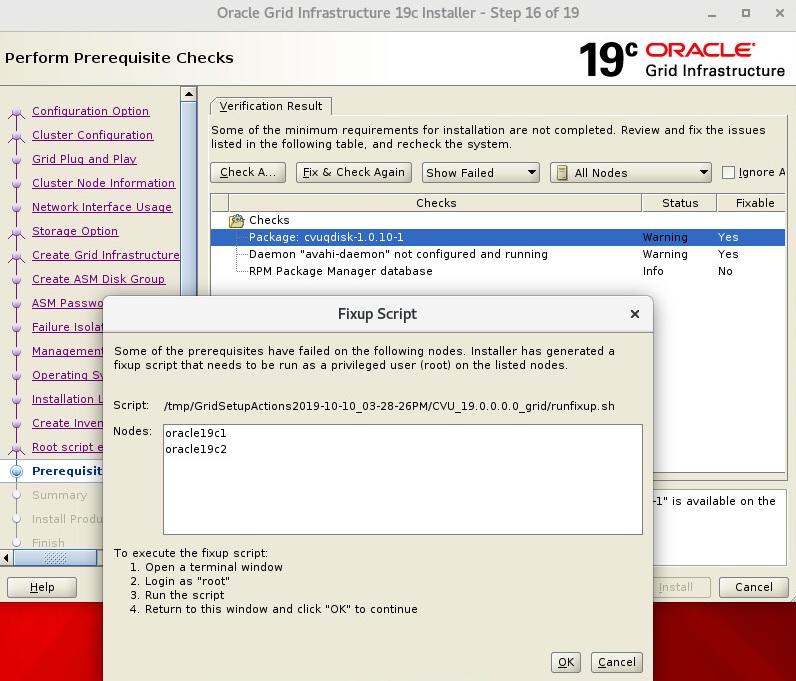
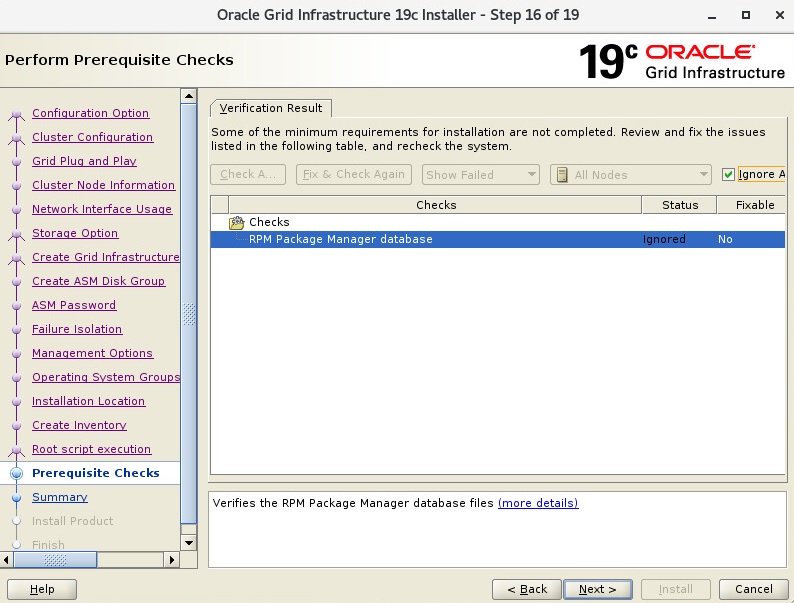
RPM Package Manager info is not problem. I ignored and continued.
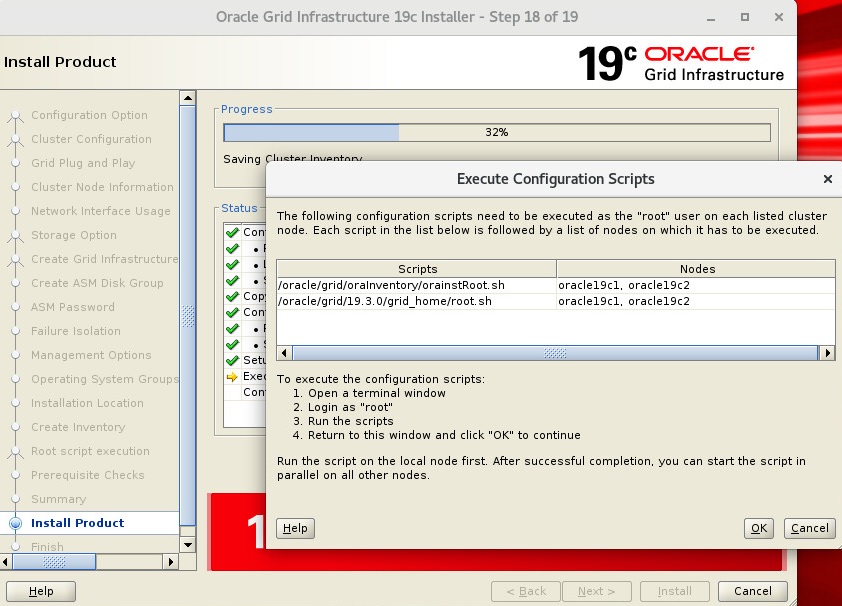
Node 1
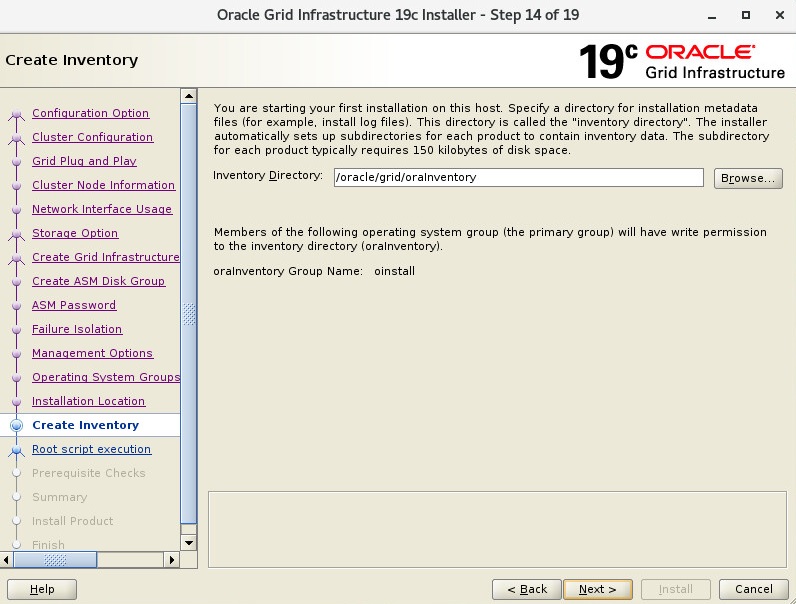
[root@oracle19c1 ~]# /oracle/grid/oraInventory/orainstRoot.sh
Changing permissions of /oracle/grid/oraInventory.
Adding read,write permissions for group.
Removing read,write,execute permissions for world.Changing groupname of /oracle/grid/oraInventory to oinstall.
The execution of the script is complete.
[root@oracle19c1 ~]# /oracle/grid/19.3.0/grid_home/root.sh
Performing root user operation.The following environment variables are set as:
ORACLE_OWNER= grid
ORACLE_HOME= /oracle/grid/19.3.0/grid_homeEnter the full pathname of the local bin directory: [/usr/local/bin]:
Copying dbhome to /usr/local/bin …
Copying oraenv to /usr/local/bin …
Copying coraenv to /usr/local/bin …Creating /etc/oratab file…
Entries will be added to the /etc/oratab file as needed by
Database Configuration Assistant when a database is created
Finished running generic part of root script.
Now product-specific root actions will be performed.
Relinking oracle with rac_on option
Using configuration parameter file: /oracle/grid/19.3.0/grid_home/crs/install/crsconfig_params
The log of current session can be found at:
/oracle/grid/gridbase/crsdata/oracle19c1/crsconfig/rootcrs_oracle19c1_2019-10-10_04-07-49PM.log
2019/10/10 16:08:06 CLSRSC-594: Executing installation step 1 of 19: ‘SetupTFA’.
2019/10/10 16:08:06 CLSRSC-594: Executing installation step 2 of 19: ‘ValidateEnv’.
2019/10/10 16:08:06 CLSRSC-363: User ignored prerequisites during installation
2019/10/10 16:08:06 CLSRSC-594: Executing installation step 3 of 19: ‘CheckFirstNode’.
2019/10/10 16:08:09 CLSRSC-594: Executing installation step 4 of 19: ‘GenSiteGUIDs’.
2019/10/10 16:08:11 CLSRSC-594: Executing installation step 5 of 19: ‘SetupOSD’.
2019/10/10 16:08:11 CLSRSC-594: Executing installation step 6 of 19: ‘CheckCRSConfig’.
2019/10/10 16:08:12 CLSRSC-594: Executing installation step 7 of 19: ‘SetupLocalGPNP’.
2019/10/10 16:08:48 CLSRSC-594: Executing installation step 8 of 19: ‘CreateRootCert’.
2019/10/10 16:08:50 CLSRSC-4002: Successfully installed Oracle Trace File Analyzer (TFA) Collector.
2019/10/10 16:08:55 CLSRSC-594: Executing installation step 9 of 19: ‘ConfigOLR’.
2019/10/10 16:09:15 CLSRSC-594: Executing installation step 10 of 19: ‘ConfigCHMOS’.
2019/10/10 16:09:15 CLSRSC-594: Executing installation step 11 of 19: ‘CreateOHASD’.
2019/10/10 16:09:23 CLSRSC-594: Executing installation step 12 of 19: ‘ConfigOHASD’.
2019/10/10 16:09:24 CLSRSC-330: Adding Clusterware entries to file ‘oracle-ohasd.service’
2019/10/10 16:10:41 CLSRSC-594: Executing installation step 13 of 19: ‘InstallAFD’.
2019/10/10 16:10:51 CLSRSC-594: Executing installation step 14 of 19: ‘InstallACFS’.
2019/10/10 16:12:22 CLSRSC-594: Executing installation step 15 of 19: ‘InstallKA’.
2019/10/10 16:12:31 CLSRSC-594: Executing installation step 16 of 19: ‘InitConfig’.ASM has been created and started successfully.
[DBT-30001] Disk groups created successfully. Check /oracle/grid/gridbase/cfgtoollogs/asmca/asmca-191010PM041305.log for details.
2019/10/10 16:14:08 CLSRSC-482: Running command: ‘/oracle/grid/19.3.0/grid_home/bin/ocrconfig -upgrade grid oinstall’
CRS-4256: Updating the profile
Successful addition of voting disk 2bfd3893f7a74f0bbff027bb80aa4215.
Successfully replaced voting disk group with +OCR_VOTING.
CRS-4256: Updating the profile
CRS-4266: Voting file(s) successfully replaced
## STATE File Universal Id File Name Disk group
— —– —————– ——— ———
1. ONLINE 2bfd3893f7a74f0bbff027bb80aa4215 (/dev/oracleasm/disks/OCR_VOTING1) [OCR_VOTING]
Located 1 voting disk(s).
2019/10/10 16:15:50 CLSRSC-594: Executing installation step 17 of 19: ‘StartCluster’.
2019/10/10 16:17:02 CLSRSC-343: Successfully started Oracle Clusterware stack
2019/10/10 16:17:02 CLSRSC-594: Executing installation step 18 of 19: ‘ConfigNode’.
2019/10/10 16:19:07 CLSRSC-594: Executing installation step 19 of 19: ‘PostConfig’.
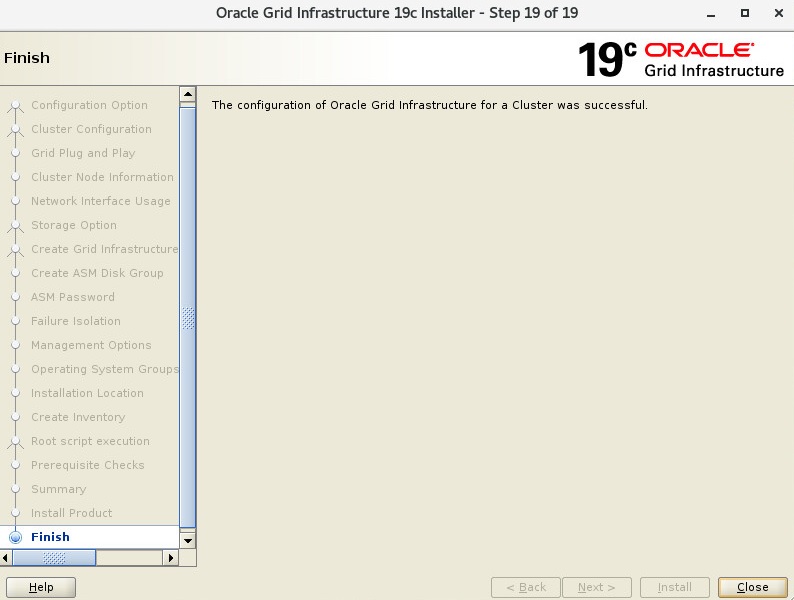
2019/10/10 16:19:44 CLSRSC-325: Configure Oracle Grid Infrastructure for a Cluster … succeeded
Node 2
[root@oracle19c2 ~]# /oracle/grid/oraInventory/orainstRoot.sh
Changing permissions of /oracle/grid/oraInventory.
Adding read,write permissions for group.
Removing read,write,execute permissions for world.Changing groupname of /oracle/grid/oraInventory to oinstall.
The execution of the script is complete.
[root@oracle19c2 ~]# /oracle/grid/19.3.0/grid_home/root.sh
Performing root user operation.The following environment variables are set as:
ORACLE_OWNER= grid
ORACLE_HOME= /oracle/grid/19.3.0/grid_homeEnter the full pathname of the local bin directory: [/usr/local/bin]:
Copying dbhome to /usr/local/bin …
Copying oraenv to /usr/local/bin …
Copying coraenv to /usr/local/bin …Creating /etc/oratab file…
Entries will be added to the /etc/oratab file as needed by
Database Configuration Assistant when a database is created
Finished running generic part of root script.
Now product-specific root actions will be performed.
Relinking oracle with rac_on option
Using configuration parameter file: /oracle/grid/19.3.0/grid_home/crs/install/crsconfig_params
The log of current session can be found at:
/oracle/grid/gridbase/crsdata/oracle19c2/crsconfig/rootcrs_oracle19c2_2019-10-10_04-20-38PM.log
2019/10/10 16:20:49 CLSRSC-594: Executing installation step 1 of 19: ‘SetupTFA’.
2019/10/10 16:20:49 CLSRSC-594: Executing installation step 2 of 19: ‘ValidateEnv’.
2019/10/10 16:20:49 CLSRSC-363: User ignored prerequisites during installation
2019/10/10 16:20:49 CLSRSC-594: Executing installation step 3 of 19: ‘CheckFirstNode’.
2019/10/10 16:20:51 CLSRSC-594: Executing installation step 4 of 19: ‘GenSiteGUIDs’.
2019/10/10 16:20:51 CLSRSC-594: Executing installation step 5 of 19: ‘SetupOSD’.
2019/10/10 16:20:51 CLSRSC-594: Executing installation step 6 of 19: ‘CheckCRSConfig’.
2019/10/10 16:20:53 CLSRSC-594: Executing installation step 7 of 19: ‘SetupLocalGPNP’.
2019/10/10 16:20:55 CLSRSC-594: Executing installation step 8 of 19: ‘CreateRootCert’.
2019/10/10 16:20:55 CLSRSC-594: Executing installation step 9 of 19: ‘ConfigOLR’.
2019/10/10 16:21:06 CLSRSC-594: Executing installation step 10 of 19: ‘ConfigCHMOS’.
2019/10/10 16:21:06 CLSRSC-594: Executing installation step 11 of 19: ‘CreateOHASD’.
2019/10/10 16:21:09 CLSRSC-594: Executing installation step 12 of 19: ‘ConfigOHASD’.
2019/10/10 16:21:09 CLSRSC-330: Adding Clusterware entries to file ‘oracle-ohasd.service’
2019/10/10 16:21:23 CLSRSC-4002: Successfully installed Oracle Trace File Analyzer (TFA) Collector.
2019/10/10 16:22:49 CLSRSC-594: Executing installation step 13 of 19: ‘InstallAFD’.
2019/10/10 16:22:52 CLSRSC-594: Executing installation step 14 of 19: ‘InstallACFS’.
2019/10/10 16:24:25 CLSRSC-594: Executing installation step 15 of 19: ‘InstallKA’.
2019/10/10 16:24:27 CLSRSC-594: Executing installation step 16 of 19: ‘InitConfig’.
2019/10/10 16:24:38 CLSRSC-594: Executing installation step 17 of 19: ‘StartCluster’.
2019/10/10 16:25:29 CLSRSC-343: Successfully started Oracle Clusterware stack
2019/10/10 16:25:29 CLSRSC-594: Executing installation step 18 of 19: ‘ConfigNode’.
2019/10/10 16:25:53 CLSRSC-594: Executing installation step 19 of 19: ‘PostConfig’.
2019/10/10 16:26:05 CLSRSC-325: Configure Oracle Grid Infrastructure for a Cluster … succeeded
Check Cluster
[root@oracle19c1 ~]# /oracle/grid/19.3.0/grid_home/bin/crsctl check cluster -all
**************************************************************
oracle19c1:
CRS-4537: Cluster Ready Services is online
CRS-4529: Cluster Synchronization Services is online
CRS-4533: Event Manager is online
**************************************************************
oracle19c2:
CRS-4537: Cluster Ready Services is online
CRS-4529: Cluster Synchronization Services is online
CRS-4533: Event Manager is online
**************************************************************
[root@oracle19c1 ~]# /oracle/grid/19.3.0/grid_home/bin/crsctl stat res -t
——————————————————————————–
Name Target State Server State details
——————————————————————————–
Local Resources
——————————————————————————–
ora.LISTENER.lsnr
ONLINE ONLINE oracle19c1 STABLE
ONLINE ONLINE oracle19c2 STABLE
ora.chad
ONLINE ONLINE oracle19c1 STABLE
ONLINE ONLINE oracle19c2 STABLE
ora.net1.network
ONLINE ONLINE oracle19c1 STABLE
ONLINE ONLINE oracle19c2 STABLE
ora.ons
ONLINE ONLINE oracle19c1 STABLE
ONLINE ONLINE oracle19c2 STABLE
ora.proxy_advm
OFFLINE OFFLINE oracle19c1 STABLE
OFFLINE OFFLINE oracle19c2 STABLE
——————————————————————————–
Cluster Resources
——————————————————————————–
ora.ASMNET1LSNR_ASM.lsnr(ora.asmgroup)
1 ONLINE ONLINE oracle19c1 STABLE
2 ONLINE ONLINE oracle19c2 STABLE
3 OFFLINE OFFLINE STABLE
ora.DATA.dg(ora.asmgroup)
1 ONLINE ONLINE oracle19c1 STABLE
2 ONLINE ONLINE oracle19c2 STABLE
3 ONLINE OFFLINE STABLE
ora.FRA.dg(ora.asmgroup)
1 ONLINE ONLINE oracle19c1 STABLE
2 ONLINE ONLINE oracle19c2 STABLE
3 ONLINE OFFLINE STABLE
ora.LISTENER_SCAN1.lsnr
1 ONLINE ONLINE oracle19c2 STABLE
ora.LISTENER_SCAN2.lsnr
1 ONLINE ONLINE oracle19c1 STABLE
ora.LISTENER_SCAN3.lsnr
1 ONLINE ONLINE oracle19c1 STABLE
ora.OCR_VOTING.dg(ora.asmgroup)
1 ONLINE ONLINE oracle19c1 STABLE
2 ONLINE ONLINE oracle19c2 STABLE
3 OFFLINE OFFLINE STABLE
ora.asm(ora.asmgroup)
1 ONLINE ONLINE oracle19c1 Started,STABLE
2 ONLINE ONLINE oracle19c2 Started,STABLE
3 OFFLINE OFFLINE STABLE
ora.asmnet1.asmnetwork(ora.asmgroup)
1 ONLINE ONLINE oracle19c1 STABLE
2 ONLINE ONLINE oracle19c2 STABLE
3 OFFLINE OFFLINE STABLE
ora.cvu
1 ONLINE ONLINE oracle19c1 STABLE
ora.oracle19c1.vip
1 ONLINE ONLINE oracle19c1 STABLE
ora.oracle19c2.vip
1 ONLINE ONLINE oracle19c2 STABLE
ora.qosmserver
1 ONLINE ONLINE oracle19c1 STABLE
ora.scan1.vip
1 ONLINE ONLINE oracle19c2 STABLE
ora.scan2.vip
1 ONLINE ONLINE oracle19c1 STABLE
ora.scan3.vip
1 ONLINE ONLINE oracle19c1 STABLE
——————————————————————————–
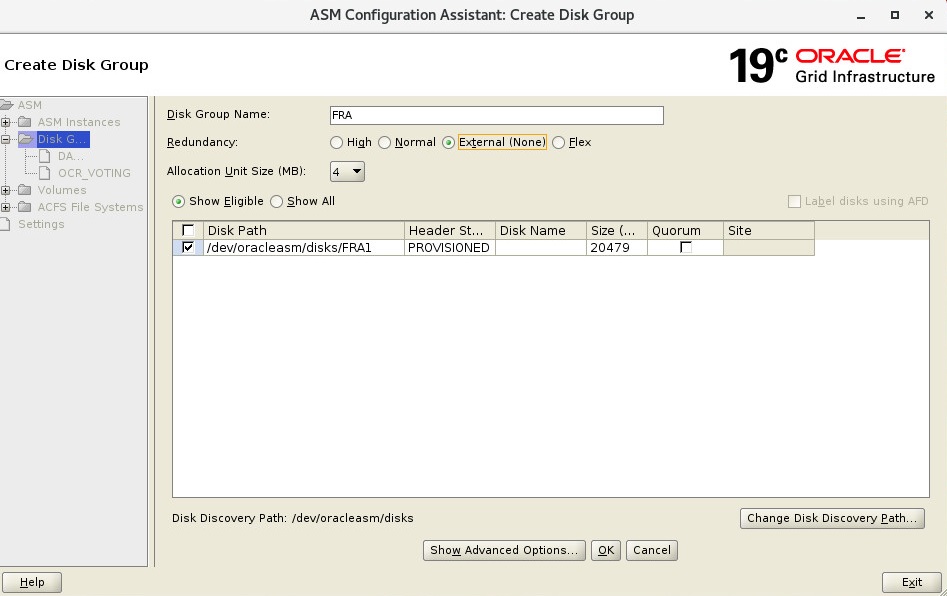
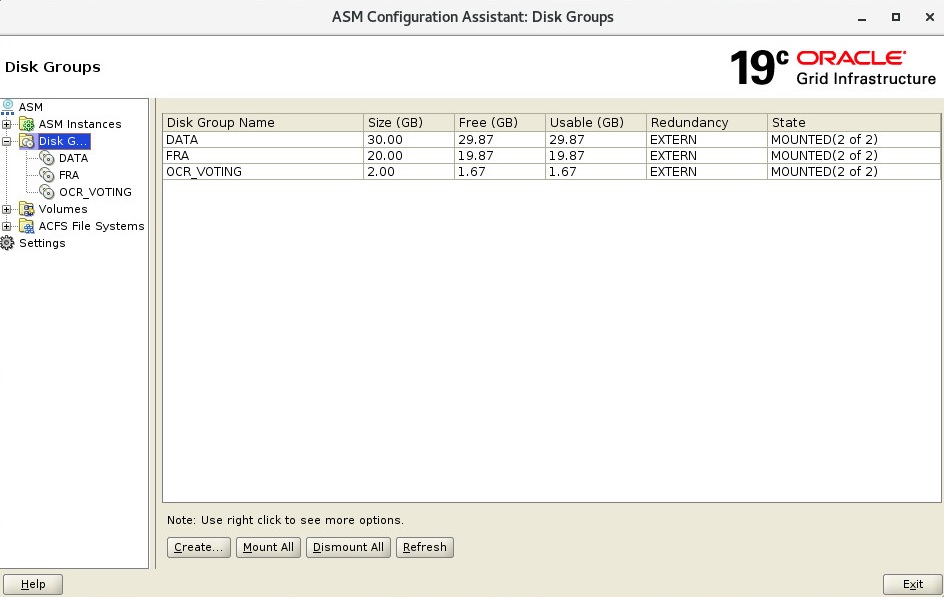
4. ASM Disk Configuration
Start ASMCA
su –
export DISPLAY=:0.0
xhost +
su – grid
export DISPLAY=:0.0
xhost +
asmca
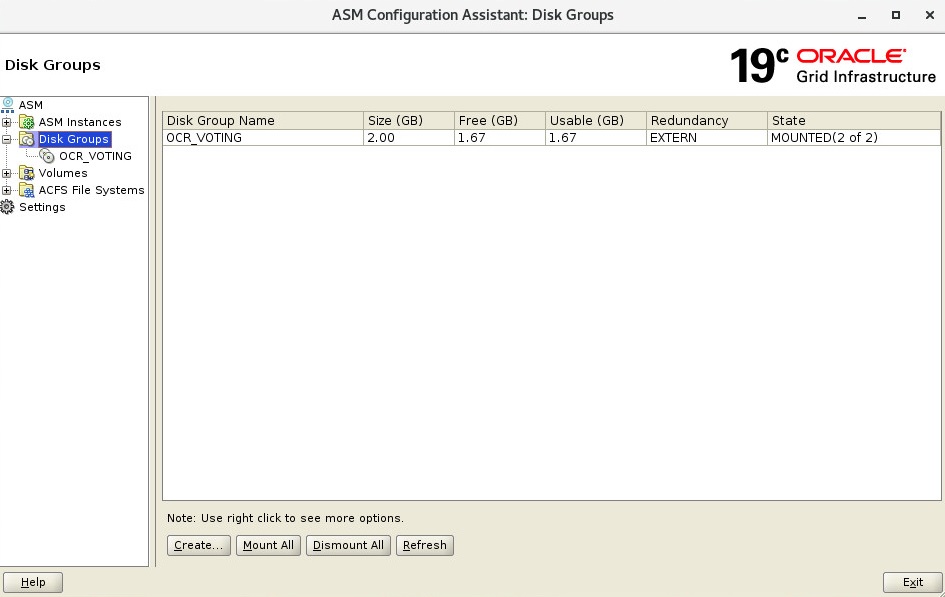
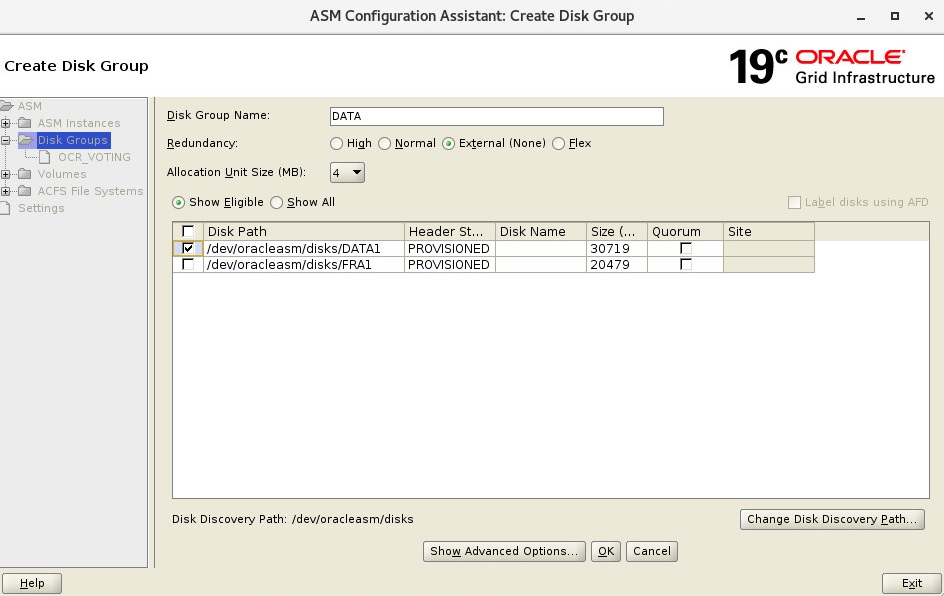
You can add DATA and FRA disks with Create button.
Third Step : Install Database
You have to copy your database installation files to oracle_home. I recommend that you copy database zip file to oracle home and change owner of zip file, and unzip with oracle user.
1. Copy and Unzip Database Files
cp LINUX.X64_193000_db_home.zip /oracle/db/19.3.0/db_home/
chown oracle.oinstall LINUX.X64_193000_db_home.zip
su – oracle
unzip LINUX.X64_193000_db_home.zip
2. Display Config and Start Database Installation
su –
export DISPLAY=:0.0
xhost +
su – oracle
export DISPLAY=:0.0
xhost +
cd /$ORACLE_HOME/
./runInstaller.sh
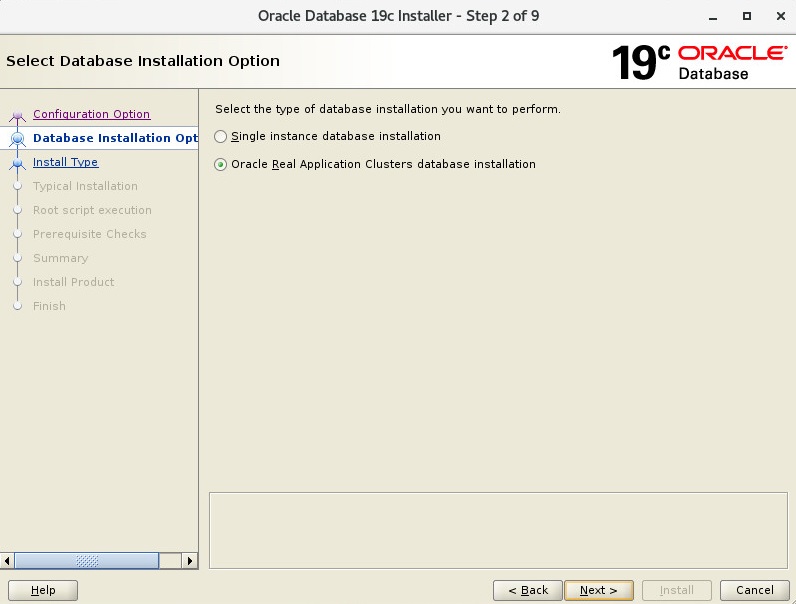
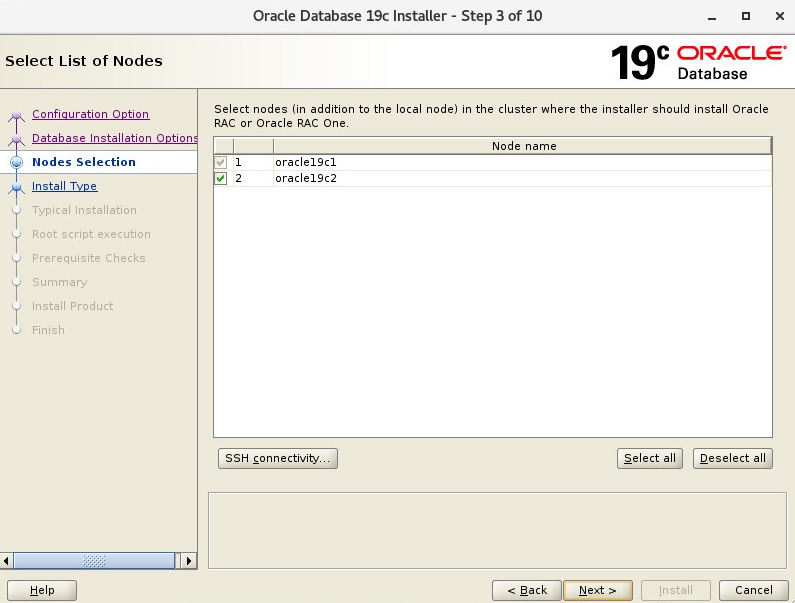
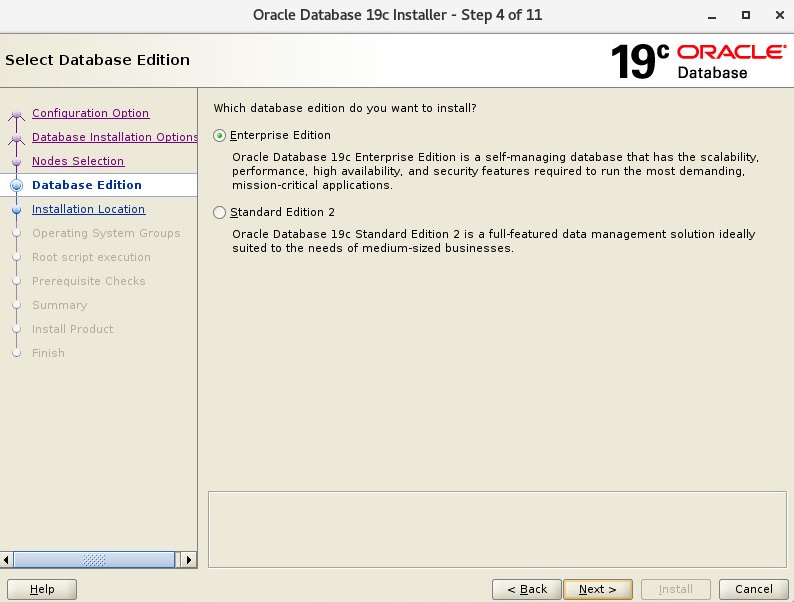
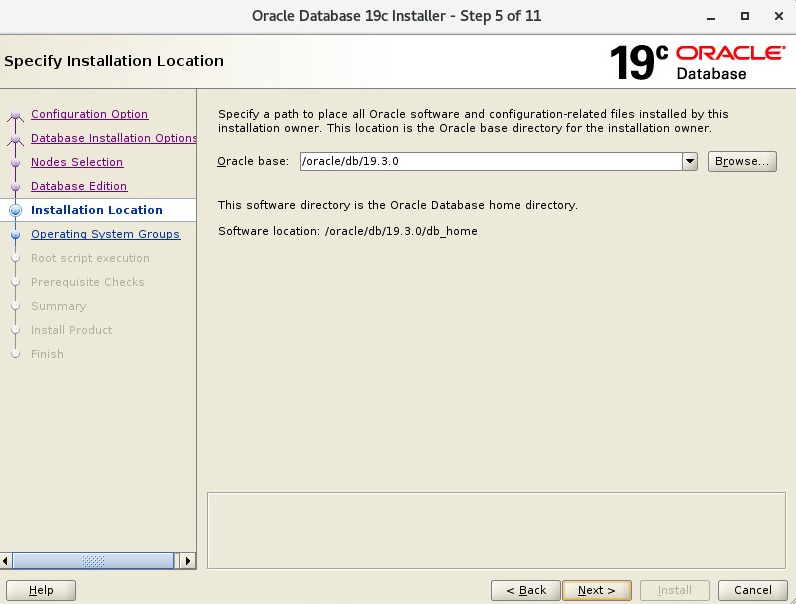
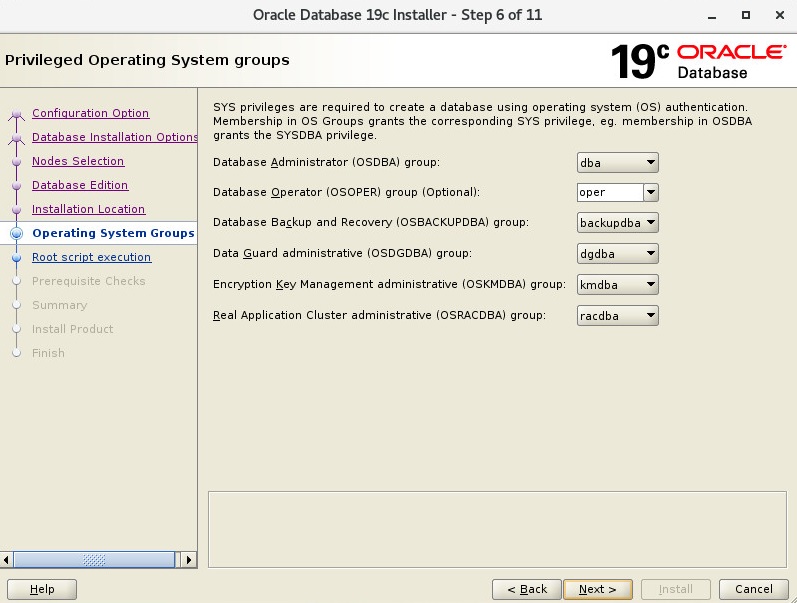
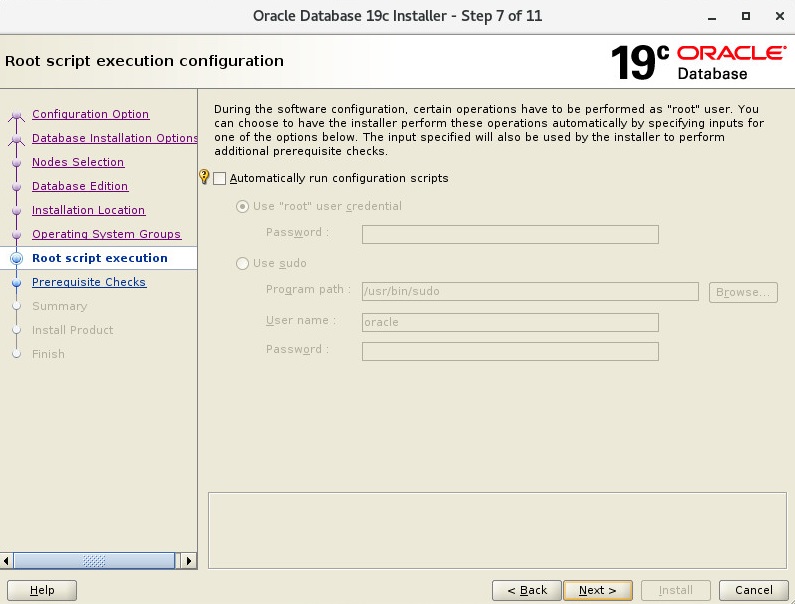
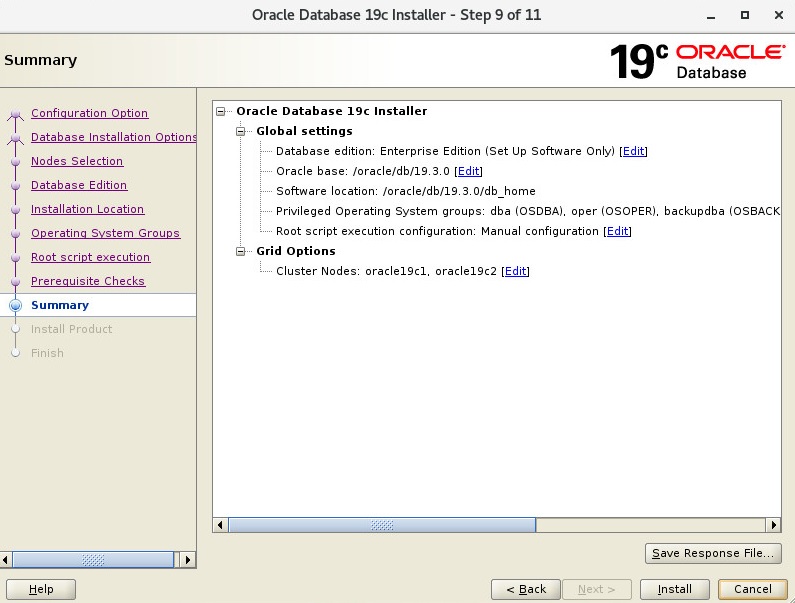
3. Database Installation Steps to RAC
Install Software

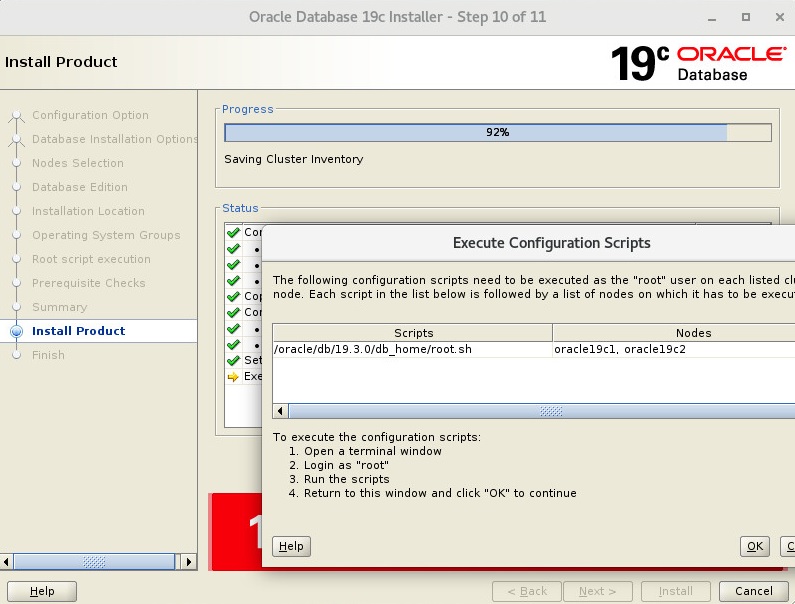
Node 1
[root@oracle19c1 ~]# /oracle/db/19.3.0/db_home/root.sh
Performing root user operation.The following environment variables are set as:
ORACLE_OWNER= oracle
ORACLE_HOME= /oracle/db/19.3.0/db_homeEnter the full pathname of the local bin directory: [/usr/local/bin]:
The contents of “dbhome” have not changed. No need to overwrite.
The contents of “oraenv” have not changed. No need to overwrite.
The contents of “coraenv” have not changed. No need to overwrite.Entries will be added to the /etc/oratab file as needed by
Database Configuration Assistant when a database is created
Finished running generic part of root script.
Now product-specific root actions will be performed.
Node 2
[root@oracle19c2 ~]# /oracle/db/19.3.0/db_home/root.sh
Performing root user operation.The following environment variables are set as:
ORACLE_OWNER= oracle
ORACLE_HOME= /oracle/db/19.3.0/db_homeEnter the full pathname of the local bin directory: [/usr/local/bin]:
The contents of “dbhome” have not changed. No need to overwrite.
The contents of “oraenv” have not changed. No need to overwrite.
The contents of “coraenv” have not changed. No need to overwrite.Entries will be added to the /etc/oratab file as needed by
Database Configuration Assistant when a database is created
Finished running generic part of root script.
Now product-specific root actions will be performed.
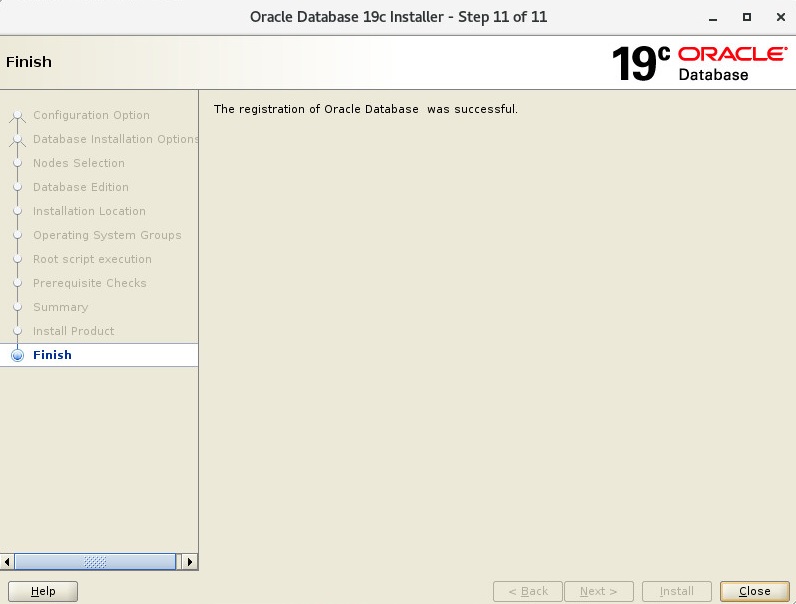
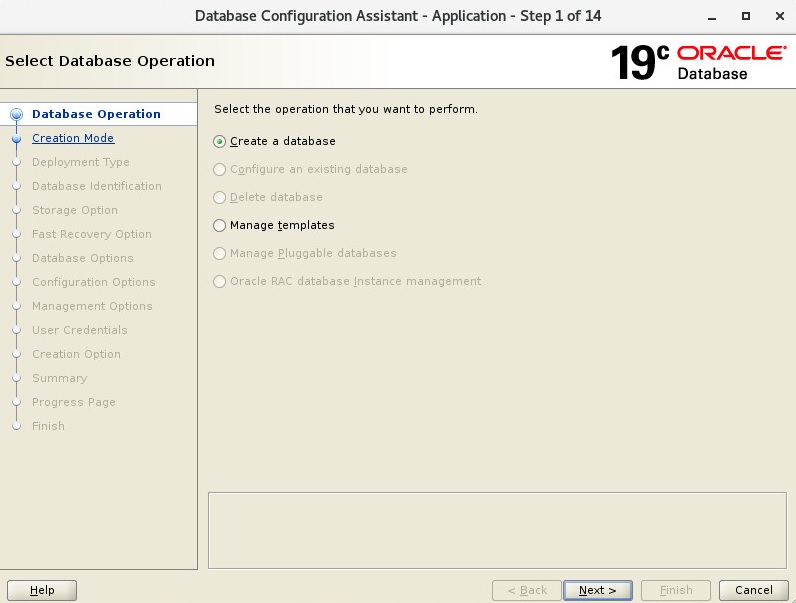
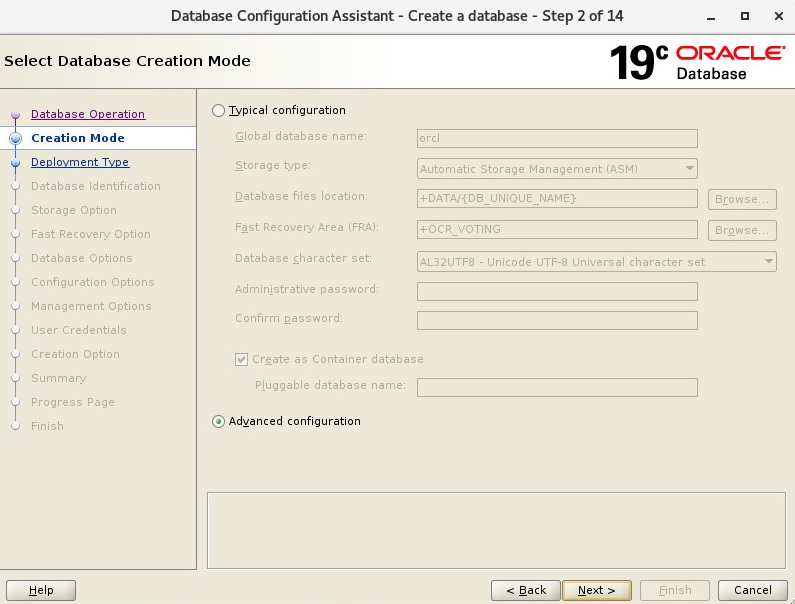
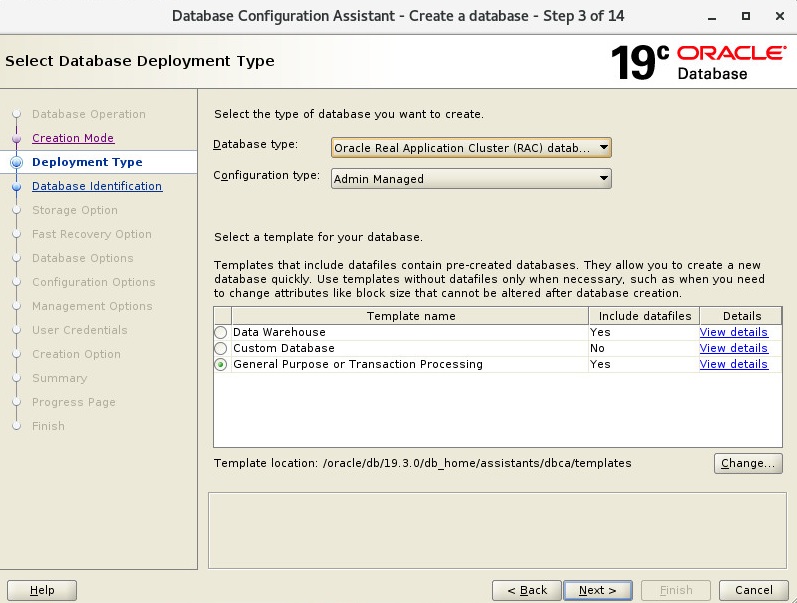
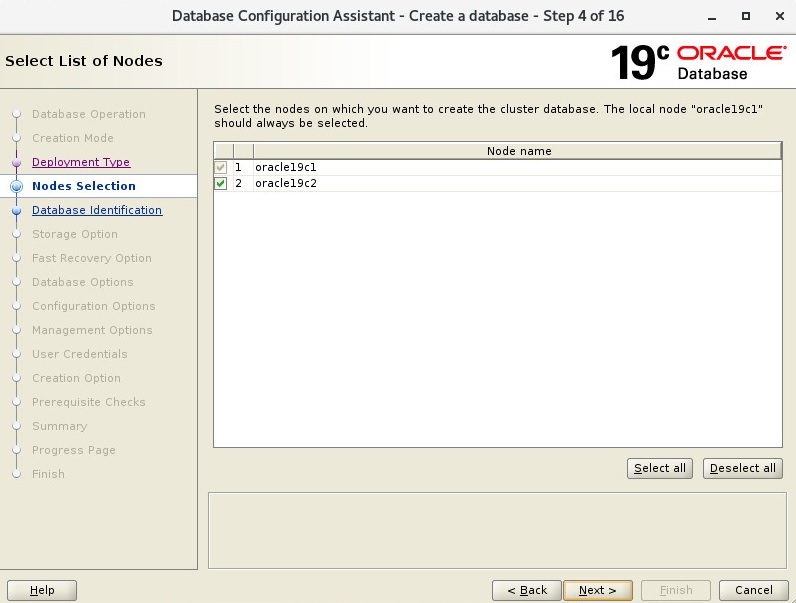
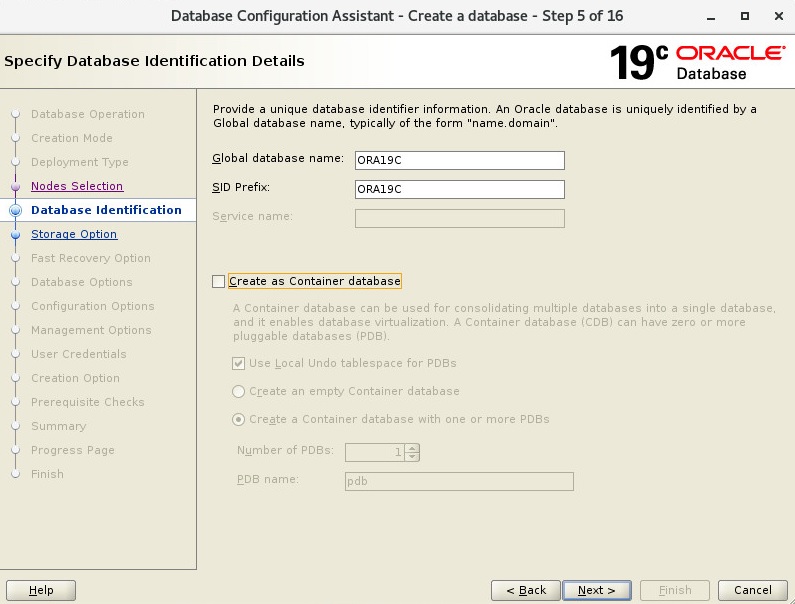
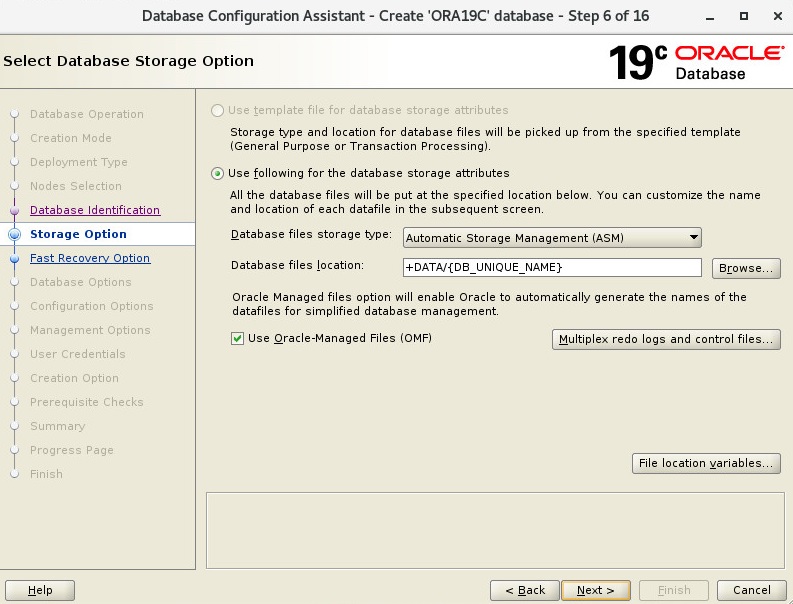
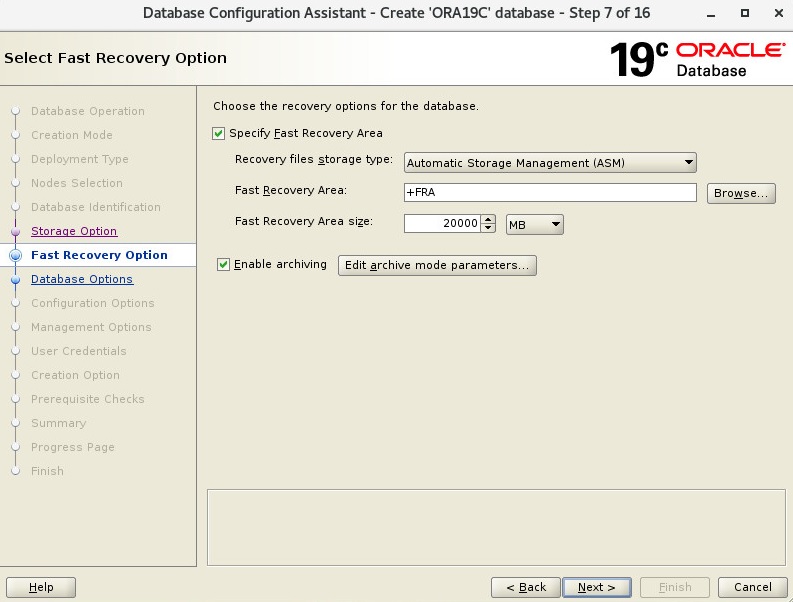
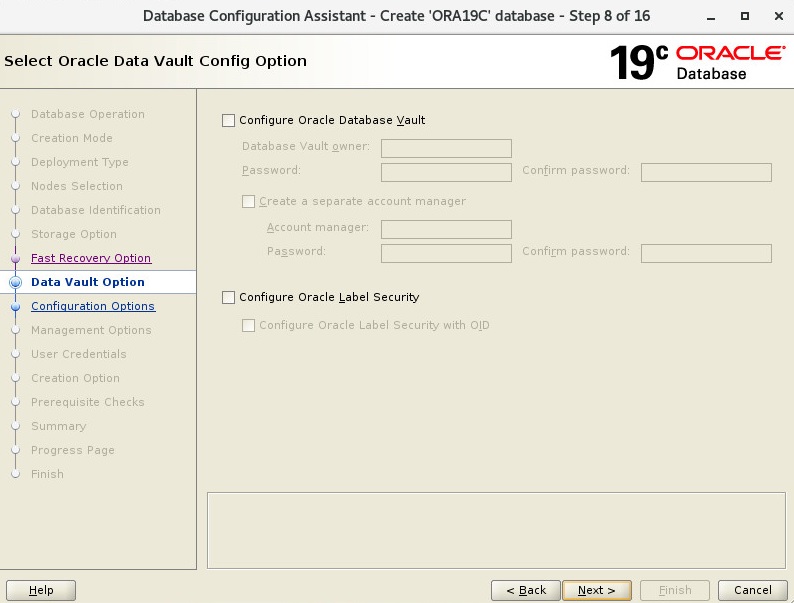
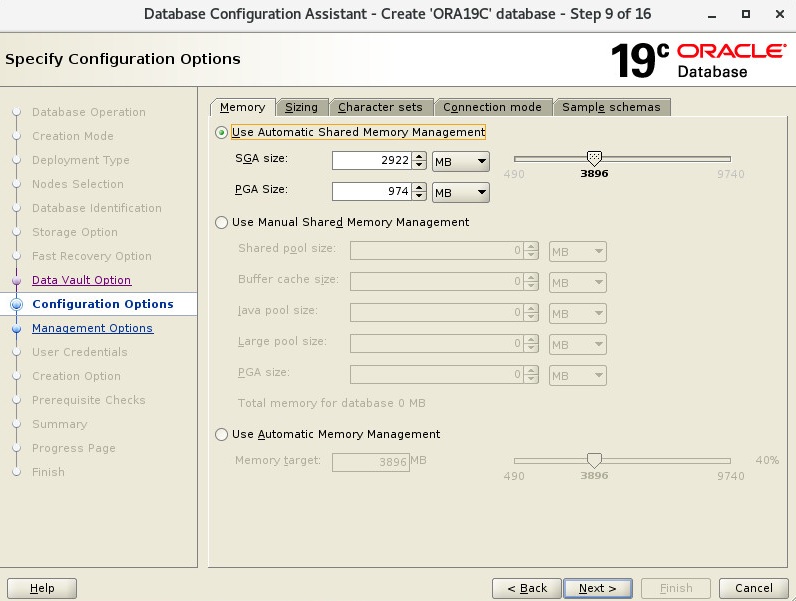
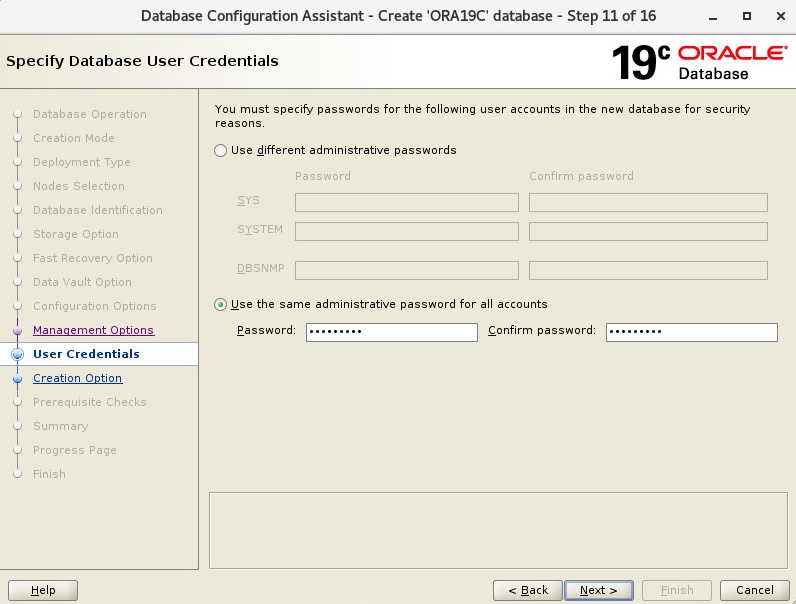
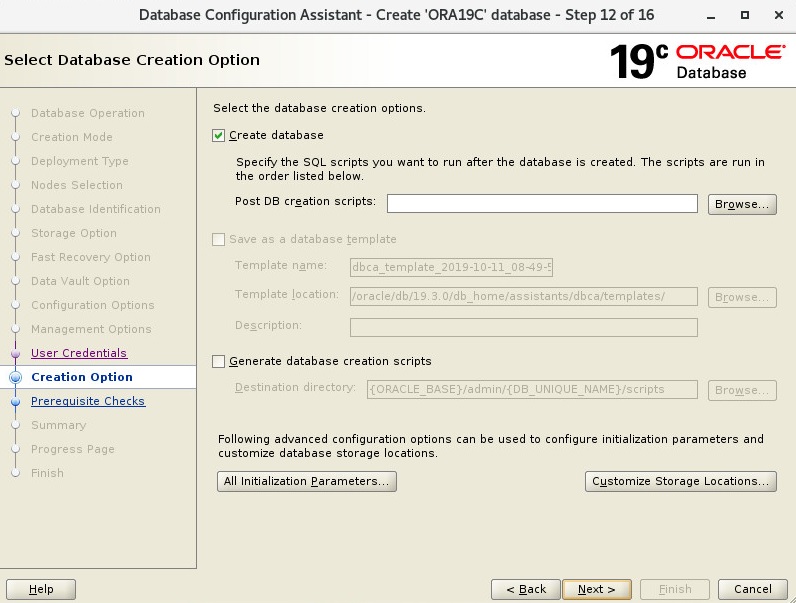
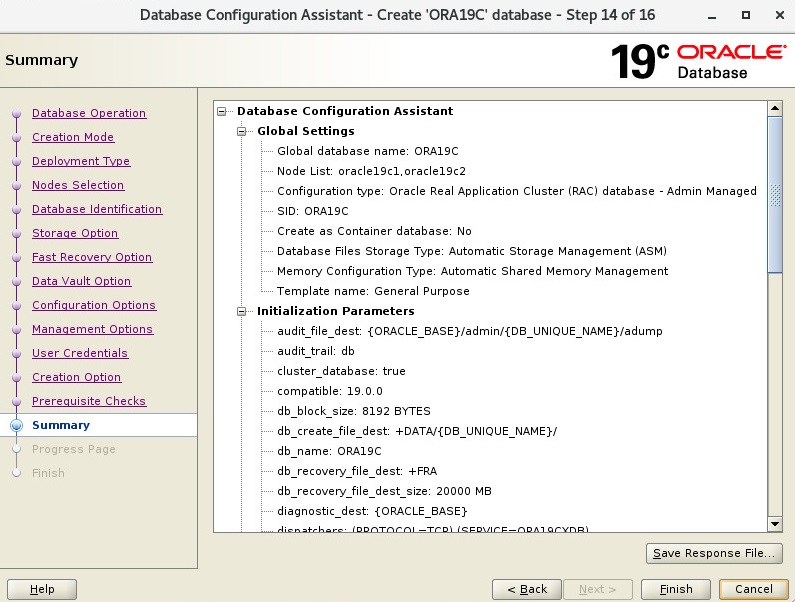
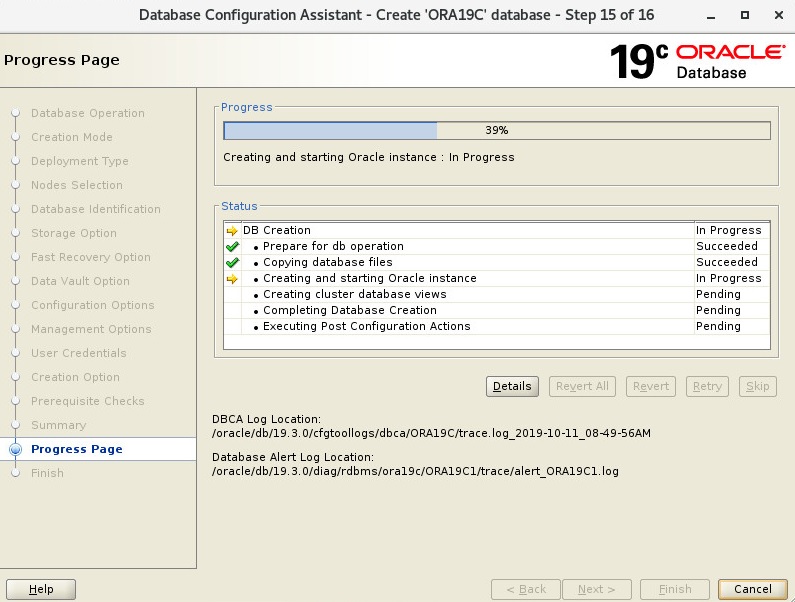
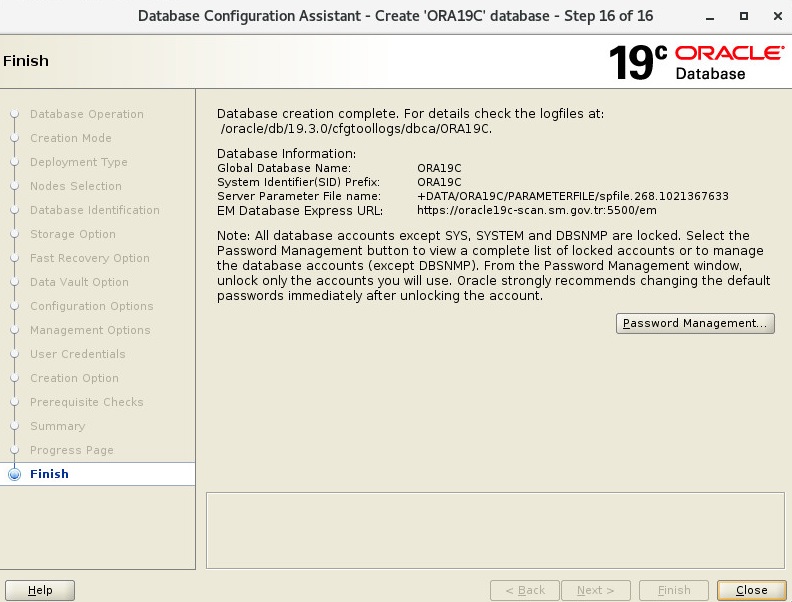
Create Database
dbca

Check Database
[oracle@oracle19c1 db_home]$ sqlplus / as sysdba
SQL*Plus: Release 19.0.0.0.0 – Production on Fri Oct 11 09:18:43 2019
Version 19.3.0.0.0Copyright (c) 1982, 2019, Oracle. All rights reserved.
Connected to:
Oracle Database 19c Enterprise Edition Release 19.0.0.0.0 – Production
Version 19.3.0.0.0SQL> select instance_name,status from gv$instance;
INSTANCE_NAME STATUS
—————- ————
ORA19C1 OPEN
ORA19C2 OPENSQL> select inst_id,name,open_mode from gv$database;
INST_ID NAME OPEN_MODE
———- ——— ——————–
1 ORA19C READ WRITE
2 ORA19C READ WRITE
 Follow
1 thought on “Oracle 19c R3 Real Application Clusters (RAC) Installation Steps on Oracle Linux 7.7”